Autonomously create a multi-tiered web application using VS Code + Cline + Claude Opus


In this rather lengthy post, I'll describe how I went about using agentic AI code generation to autonomously create, build, and deploy a custom web application.
What is Autonomous Code Generation?
Let's get a few concepts clarified first.
AI code generation is generally meant to refer to a developer's use of AI to assist in code generation through human prompting. The human (i.e., developer) types what he'd like to see, and the AI somehow automagically creates the code.
I use the term autonomous code generation where, through the use of human prompts, an AI agent independently performs multiple steps of the software development lifecycle, including coding the application, building it (i.e., packaging it), and deploying it.
Conclusion
This is a rather lengthy point, going into semi-detail of what I went through to create a web application to sell my comic book collection, thus, let me start with the conclusion.
The following screenshot is one of the pages of the application. In the end, the entire exercise was a success. Had I spent more time on it, I would have continued to refine it, changing elements of the look-and-feel, adding additional functionality, creating separate non-production and production environments in the cloud, and so on.
Here's a table summarizing my experience:
| What Went Right | What Went Wrong | |
| Prompt | With lack of specifics, the LLM (specifically Claude Opus) tries its best to create a solution following sound practices. For example, in my requirements I only specified two OCI services that I wanted used, but it created a solid architecture |
The UI was not necessary to my liking, and either more specificity in my prompt or continued refinement to the agent would have gotten it a better point. |
| Cost | If you think about it, $32.35 for 5 hours of an AI assistant is nothing. | The entire effort costed $32.35, which was higher than I expected for pilot testing. |
| AI Agent | The Cline AI agent really took over when it came to deploying the container to OCI Functions. I let it run and resolve the tens of deployment issues on its own until it was completed successfully. | It slipped my mind that I could have leveraged the AI agent to create the generate the public/private key, install the OCI client, install Terraform, and apply the Terraform configuration, as I did all those steps manually. All that was needed was some information from the OCI console ahead of time (that part must be done manually). |
Software Tools Used
This effort I embarked on relied on multiple tools and services.
- Visual Studio Code (aka VS Code) - A lightweight, extensible source code editor (i.e., IDE) from Microsoft with a large ecosystem of extensions for many programming languages.
- Cline - An open-source AI coding assistant that integrates with development environments such as VS Code to autonomously plan, write, modify, and run code using large language models such as Claude Opus.
- Claude Opus - Anthropic’s most capable large language model (LLM) designed for advanced reasoning, coding, and complex problem-solving tasks.
- Oracle Cloud Infrastructure (aka OCI) - Oracle’s enterprise cloud platform that provides compute, storage, networking, databases, and AI services for building and running scalable applications.
Essentially the only software you need to download is VS Code. Later on during development, other tools such as Terraform and the OCI CLI and various Python packages will be downloaded by the AI agent.
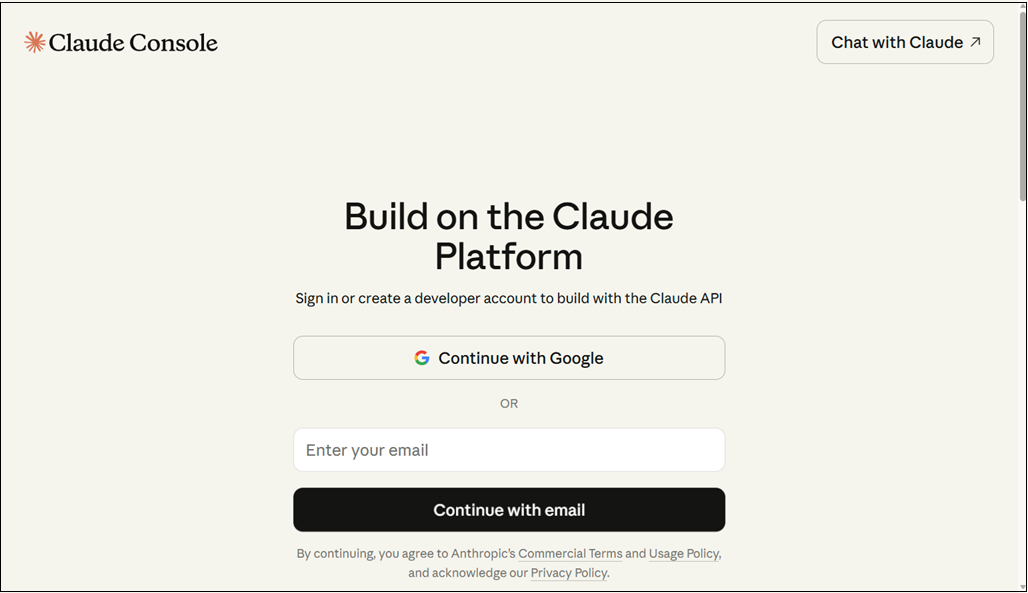
1. Create an API key for Claude Opus
You will need to create an account on the Claude platform, create an API key, and purchase some credits. This API key will be con
- Navigate to platform.claude.com and create a free account.
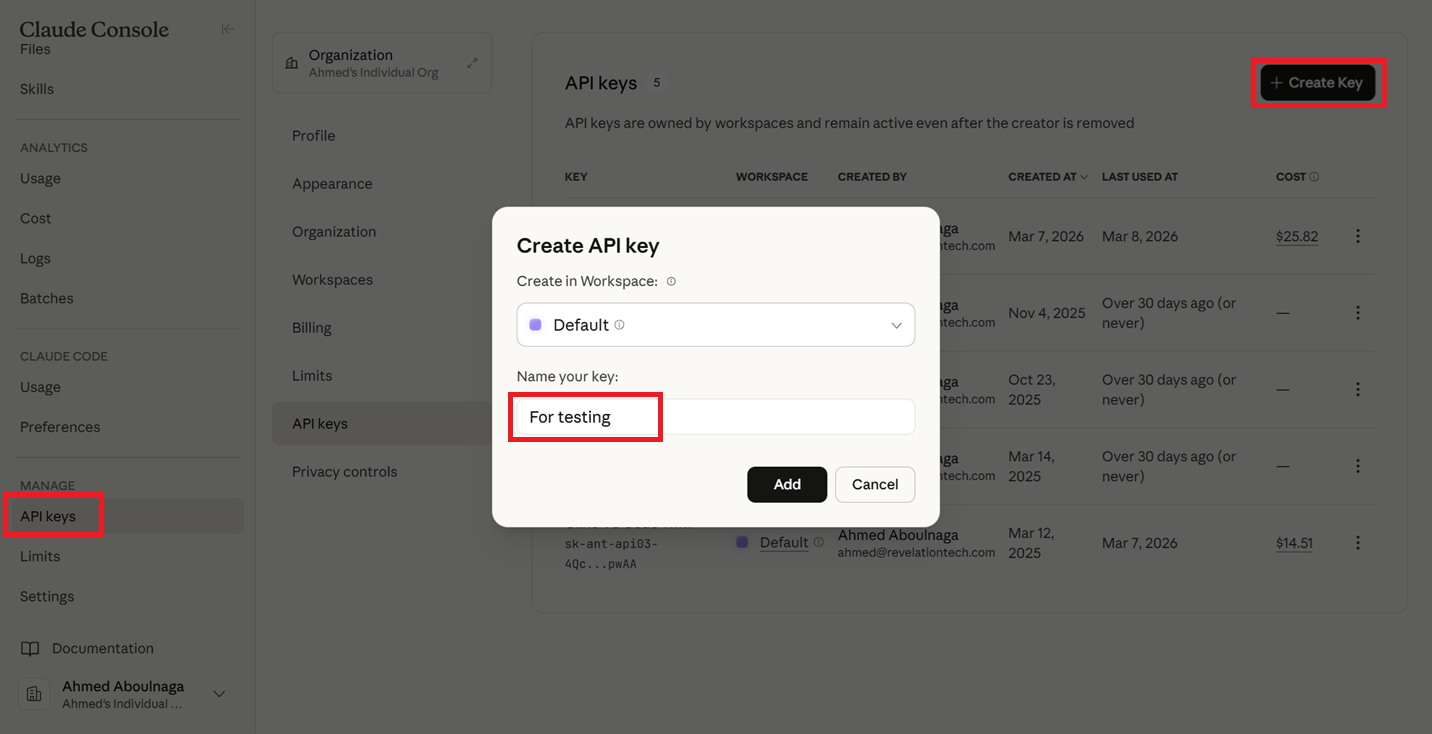
- After logging in, click on "API Keys --> Create Key", give your key any name, click "Add", and copy the value of the API and store it somewhere (it will never be displayed again, so save it someplace safe!).
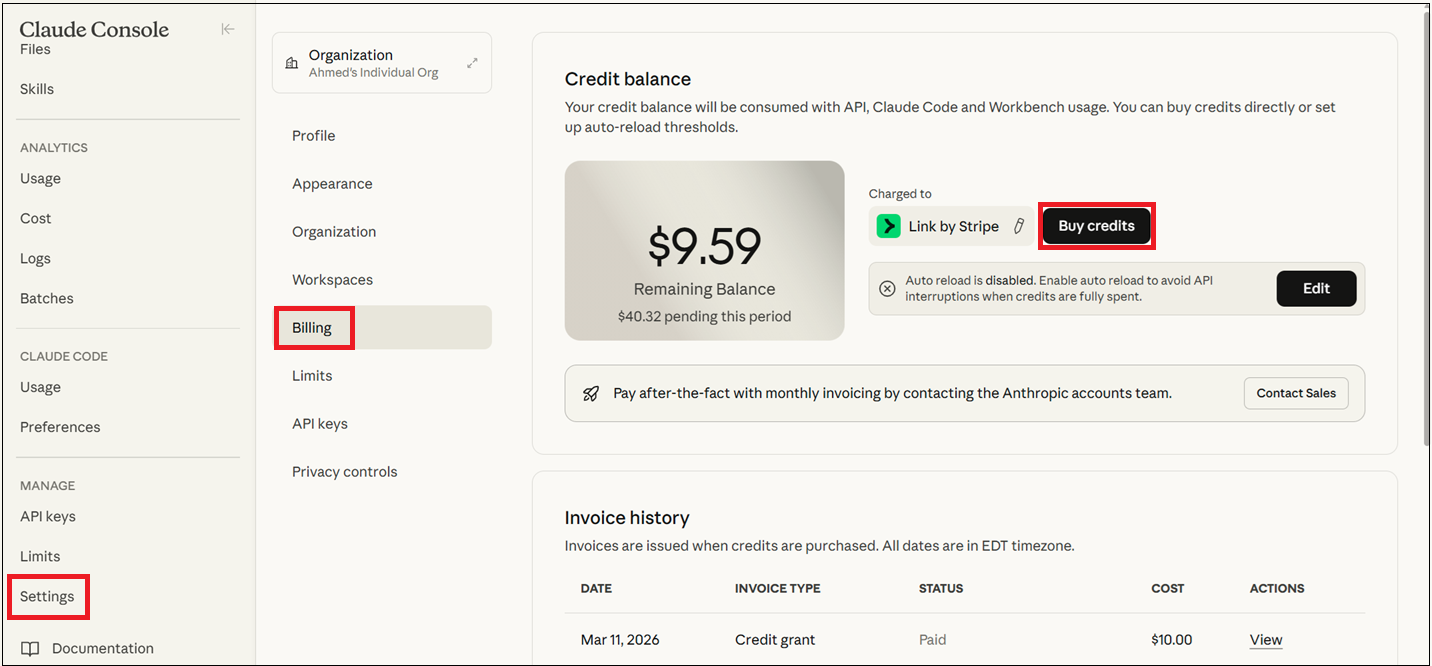
- Click on "Settings --> Billing --> Buy credits" and purchase any amount of credits to start with (e.g., $10).
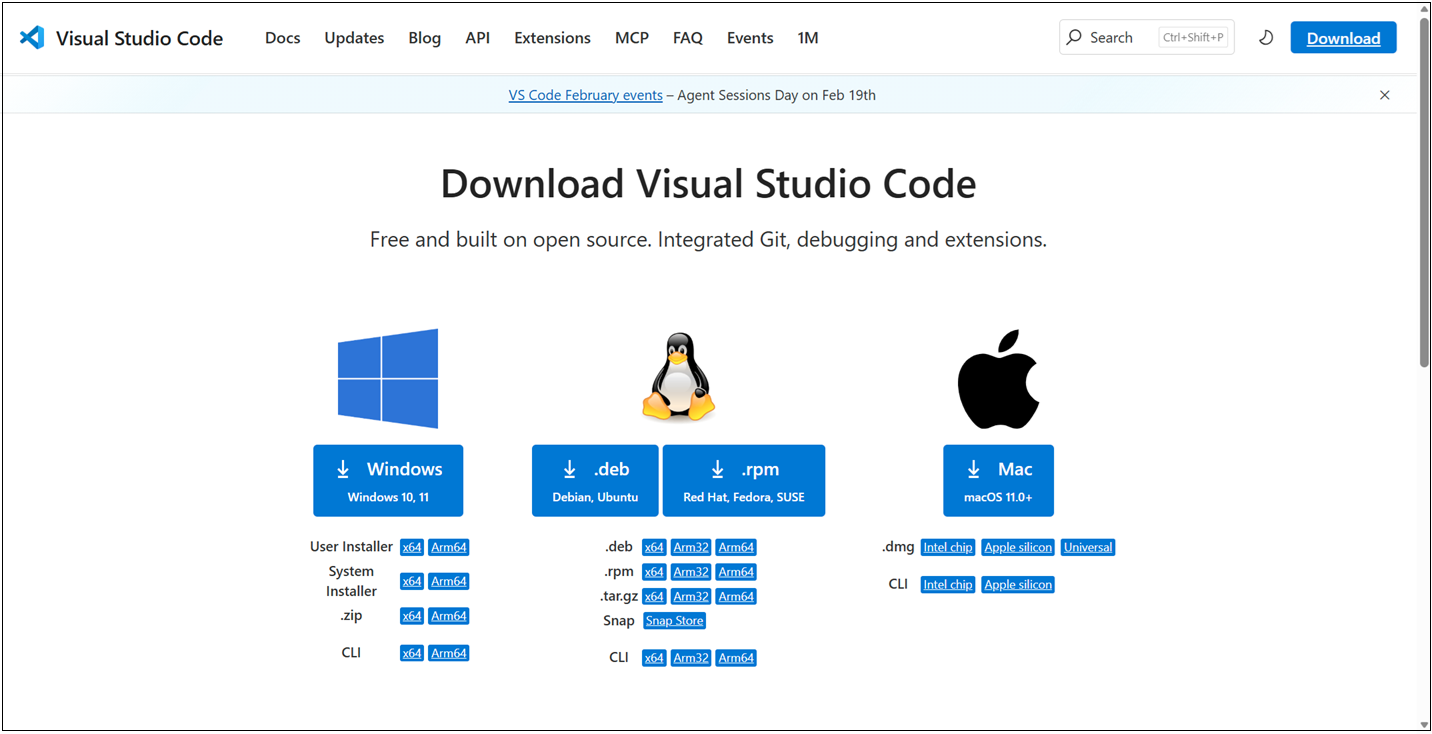
2. Download and Install VS Code
Download and install VS Code. It is a straightforward process.
- Navigate to code.visualstudio.com/download, download, and install the software.
3. Install the Cline Extension in VS Code
Cline is an autonomous coding agent that is used inside VS Code and is available via an extension. Alternatives include Claude Code and Oracle Code Assist.
- Open VS Code.
- Click on the "Extensions" button on the left.
- Search for "cline".
- Click on "Install".
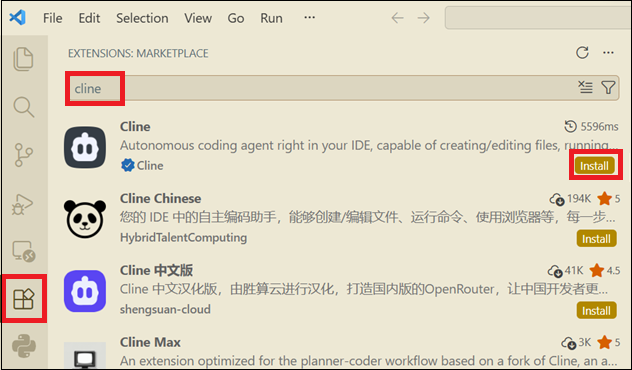
Cline is now ready for use.
4. Configure the Model in Cline
Now that Cline is installed, it is not still ready for use. Cline relies on a 3rd party LLM model of your choice. Now that we've created an API key within Claude, we will use those values here.
- If the Cline sidebar is not showing in VS Code, click on the Toggle Secondary Side Bar button on the top right or click CTRL+ALT+B.
- Click on the Settings icon.
- Select "Anthropic" as the API Provider.
- Enter the API key that you created in the Claude platform console.
- Select a model such as "claude-sonnet-4.6".
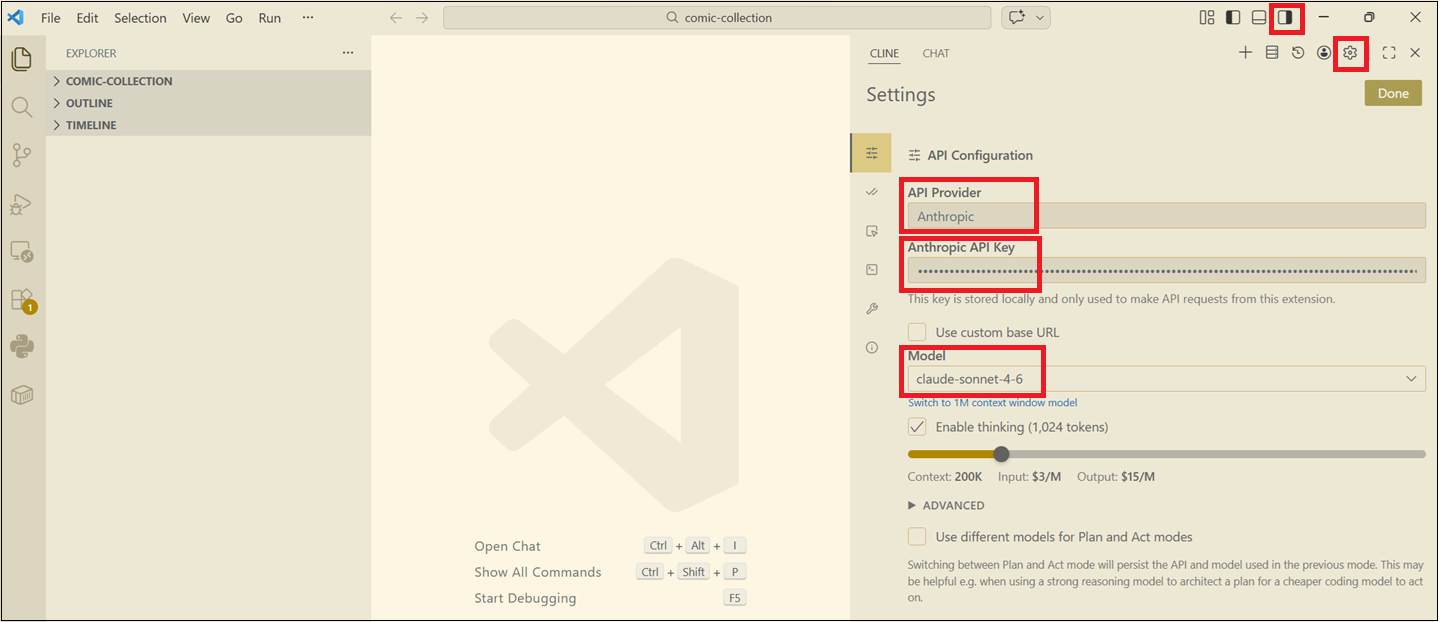
Now Cline is ready for use!
5. Create a First Draft of Your Prompt
In a text editor, start by creating a prompt of the application. Here is the prompt I created.
I want you to create a web application for me.

The details of this web application are as follows:
* The web application will be called "My Comic Book Collection".
* The web application should use a modern, responsive UI.
* The web application should use a CSS template or style similar to what is found on https://github.com/projects.
* None of the pages requires authentication, so all pages are publicly accessible.
* The web application is intended to list my comic book collection.
* Every comic book series has one or more issues (for example, the series name could be "Amazing Spider-Man volume 2" of which I only own issues 10-20).
* Each series has a price. Individual issues are not sold separately. Only entire series can be sold.
* Users can add or remove series from their cart.
* The IDE is Visual Studio Code.
* The extension being used is Cline.
* The API provider is Anthropic.
* The model is Claude Opus 4.6.
* A list of all series should be shown. Each series should display the cover of the first issue of the series, alongside the title and issues numbers owned. The user can simply add the series to the cart from here.
* The user can click on a series, after which they are taken to a page showing the cover of each comic book in the series, it's issue number, and condition (Mint, Near Mint, Very Fine, Fine, Very Good, Good, Fair, Poor).
* The web application should have an impressive home page, with impressive graphics and images that appeal to the typical comic book buyer. Generate any images needed for this page.
* When the user chooses to check out, it will send him a list of his cart in table format in an HTML email using the Oracle Cloud Infrastructure (OCI) Email Delivery service, after which his cart is cleared.
* Each page will have a logo on it. Create a new custom logo for this.
* On the bottom of each page will be a footer that states "© 2025 Ahmed Aboulnaga".
* The web application will be deployed to Oracle Cloud Infrastructure (OCI).
* Include Terraform scripts to automatically provision all required infrastructure.
* Any combination of services is acceptable, but the simpler the architecture, the better.
* The web application should be developed in Python.
* Provide test cases and instructions on how to run the test cases.
* The code should include comments describing some information throughout the code.
* Detailed instructions to create the infrastructure within OCI should be provided.
* Detailed instructions to deploy the web application to OCI should be provided.
* Include anything relevant you think should be added.
* The web application should be publicly accessible.
* The database should be Oracle Autonomous Database in OCI.
* All data should be stored in the Oracle Autonomous Database.
* Use a serverless architecture as much as possible.
* Provide instructions on how to install, setup, and execute the Infrastructure-as-Code scripts.
* Provide instructions to setting up the public/private RSA key pair on the client host where Terraform will be executed.
* Provide instructions on where to place the Terraform configuration file information returned from the OCI console.
This prompt covers, to the best of my experience, what I'm looking for in the application.
The quality of the output will only be as good as my prompt. The more details and specifics I add to the prompt, the less guessing the LLM has to do.
6. Use Meta Prompting to Improve the Prompt
Now that your prompt is mostly ready, let's use meta prompting to refine it. Meta prompting is a prompt engineering technique in generative AI where you ask a chatbot (such as ChatGPT or Gemini) to help you in creating a prompt.
In this case, my prompt is mostly ready, but we need some assistance improving it.
ROLE: <<< I am a web developer. >>>

CONTEXT: <<< I need help creating a prompt to use in my AI code generator.>>>

EXPECTATION: <<< I want you to create me a prompt that I will use in my AI coding agent (Cline) to create a web application for me. Refine the prompt and make sure it is detailed enough to produce a high quality output.

---paste the entire prompt above here---

>>>
Depending on which chatbot you use, the output could be drastically different, but it will nonetheless be an improvement and made more specific to AI coding agent.
This is the updated prompt generated by Gemini:
# Project Name: "My Comic Book Collection" Web Application

Act as an expert Full-Stack Cloud Architect and Python Developer. Your goal is to build a modern, serverless web application deployed on Oracle Cloud Infrastructure (OCI) using Python.

## 1. Tech Stack & Architecture
- **Backend:** Python (Flask or FastAPI) deployed via OCI Functions (Serverless).
- **Frontend:** Responsive UI using HTML5/JS/CSS, styled with a professional "GitHub Projects" aesthetic (clean grids, muted borders, high-contrast labels).
- **Database:** Oracle Autonomous Database (Serverless).
- **Infrastructure:** Terraform for all OCI resources.
- **Email Service:** OCI Email Delivery via SMTP/SDK.
- **Hosting:** OCI Object Storage (Static Frontend) or OCI API Gateway + Functions.

## 2. Functional Requirements
- **Home Page:** A high-impact landing page with comic-themed hero graphics. Generate a custom SVG/CSS logo for "My Comic Book Collection".
- **Gallery View:** List all comic series. Display: First issue cover image, Title, Issue range (e.g., 10-20), and Price. Include a "Quick Add to Cart" button.
- **Series Detail Page:** Display a grid of all individual issues in a series with cover images, issue numbers, and condition ratings (Mint to Poor).
- **Cart & Checkout:** - No authentication required.
    - Persistent cart (Session or LocalStorage).
    - Checkout triggers an HTML email via OCI Email Delivery containing a formatted <table> of the items.
    - Clear cart post-checkout.
- **Footer:** Must include "© 2025 Path Infotech LLC" on every page.

## 3. Infrastructure & DevOps (Terraform)
Provide complete Terraform scripts to:
- Provision a VCN and necessary subnets.
- Spin up an Oracle Autonomous Database.
- Configure OCI Email Delivery and approved senders.
- Deploy the Python application code to OCI Functions.
- Set up API Gateway to route traffic to the functions.

## 4. Documentation & Setup Instructions
Please provide the following in separate Markdown files:
- **Client Setup:** Instructions for generating RSA Key Pairs (PEM format) and configuring the OCI CLI/Terraform provider.
- **Terraform Execution:** Where to place the `tenancy_ocid`, `user_ocid`, and `fingerprint` from the OCI Console.
- **Deployment:** Step-by-step guide to `terraform init`, `apply`, and deploying the Python code.
- **Testing:** Provide a `pytest` suite and instructions for running integration tests against the API.
- **Sample Data:** Create sample data and sample images.

## 5. Design Guidelines
- Use a "GitHub-like" UI: San-serif fonts, `#f6f8fa` backgrounds, and rounded card borders.
- Code must be heavily commented for educational purposes.
- Ensure all OCI resources are within the Free Tier limits where possible.
This is the prompt that will eventually be used in Cline.
Note here that I did not define the target architecture in the cloud aside from the use of the Oracle Autonomous Database and OCI Email Delivery services. Everything else is up to the AI agent to choose.
7. Submit the Prompt to Cline to Create the Application
Copy the entire prompt from earlier, and back within VS Code, paste it in the prompt.
- In VS Code, open a new, empty folder to host your project files (in this example, I had an empty folder called
comic-collection). - Paste the prompt.
- Click on the play button highlighted in red.

But before you do, note the sections highlighted in blue. It's important to know a few things:
Plan or Act?
Typically, you want to select "Plan" first. Cline here generates a step-by-step strategy and it doesn't actually do anything. It will not create any code. It will not perform any actions. It will simply create a plan.
With Plan:
- No changes are made.
- No files are edited.
- No commands are executed.
Agentic AI systems can be dangerous if they act immediately. Plan gives you a preview of the AI's reasoning and intended actions.
In Act mode, Cline executes the plan.
It will read and edit files, run terminal commands, download and install dependencies, run builds, create and update code, and so on.
Auto-approve or not?
Auto-approve controls whether the developer must approve each operation during Act mode.
If auto-approve is on, as shown in the figure above, Cline will automatically perform certain actions without asking. It is not unusually to be asked for hundreds of approvals in a single session, so setting auto-approve may seem like the ideal choice, but it comes with its risks obviously.
Here's a screenshot of one of the SVG images that it created as part of the sample data generation:
8. Review Documentation Upon Completion
In my little exercise here, I set auto-approve to on and I set it to Act immediately, bypassing the Plan phase. It still performs the planning, but it just doesn't wait for my review.
After a few hours with some back and forth with the AI agent, my entire codebase is generated. Test cases were created. Documentation was written. Everything is ready to go. All this, and I don't even know what the underlying architecture is.
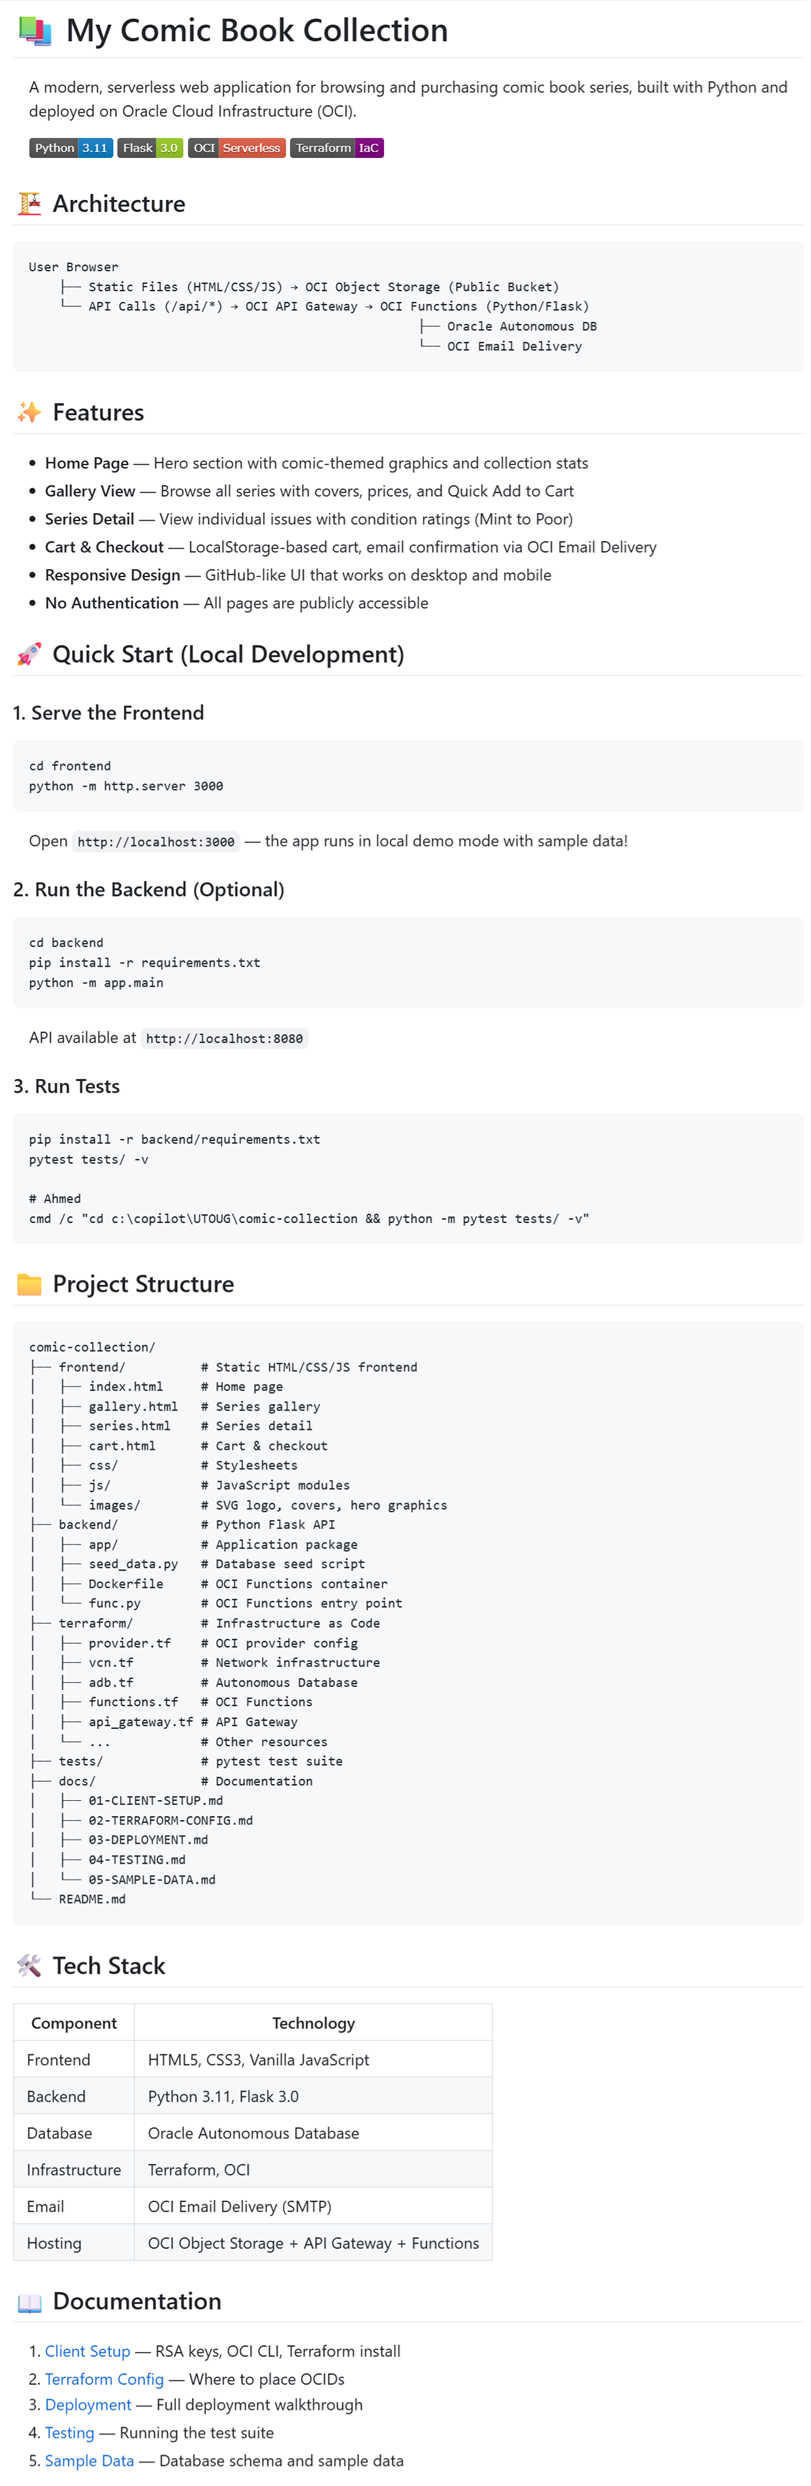
There was a well written README.md file that provided a high-level details, shown here.
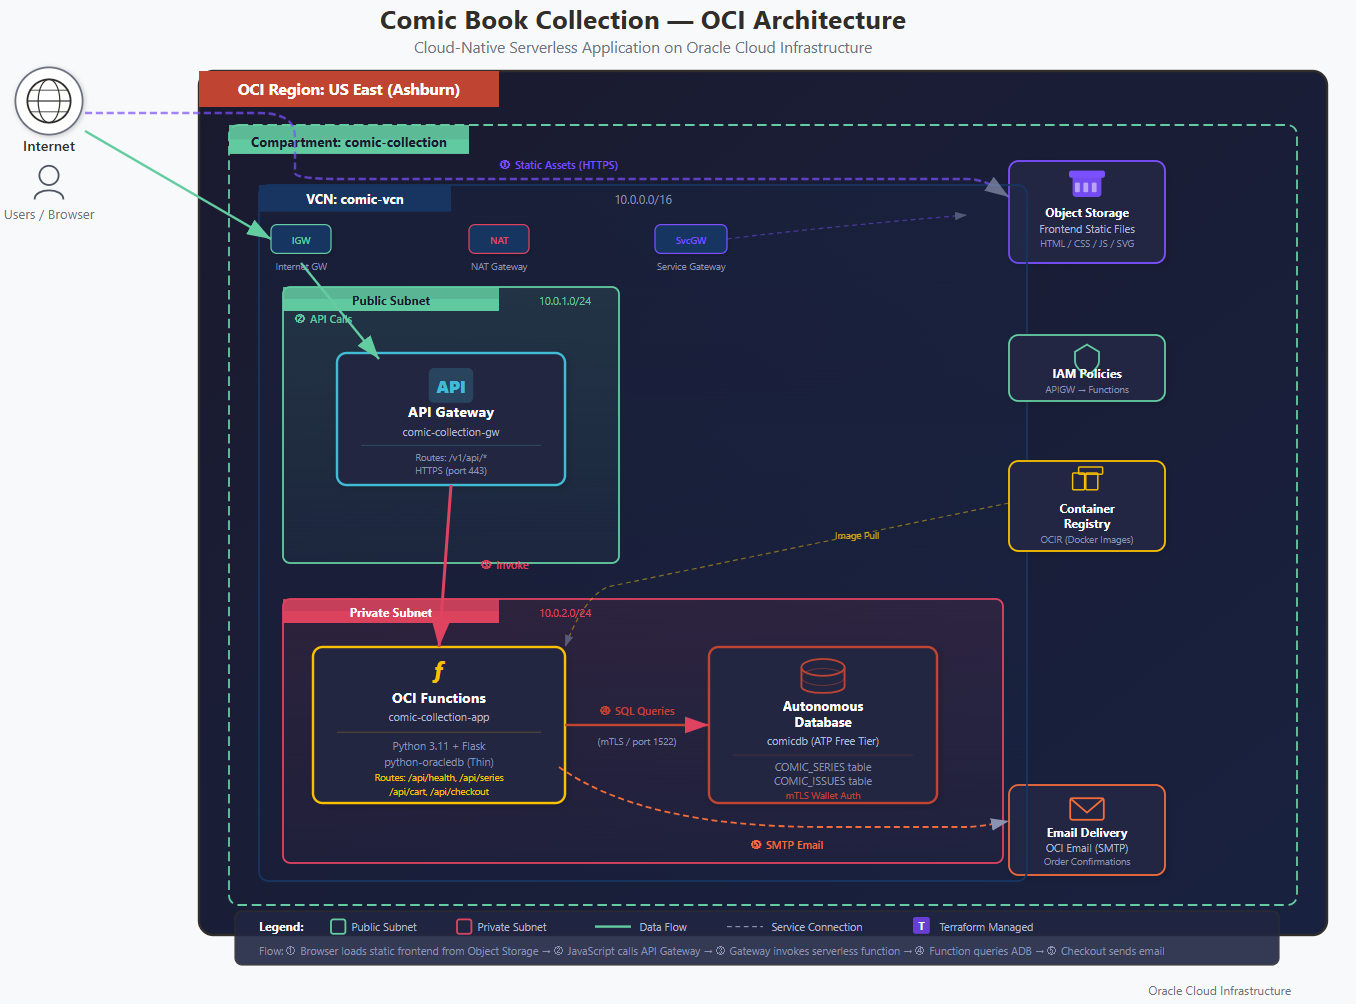
This is the diagram it generated in SVG format. Cline (via the Claude Opus LLM) exceeded my expectations in the design of the cloud architecture. It decided on:
- Object Storage to hold all frontend static files
- API Gateway as a proxy to the backend web services
- OCI Functions to host the webservers
- Container Registry to host the container artifacts
- Autonomous Database, since I requested all data to be stored in it
- OCI Email Service, since I requested it to be used
- All VCN/networking and IAM Policy setup
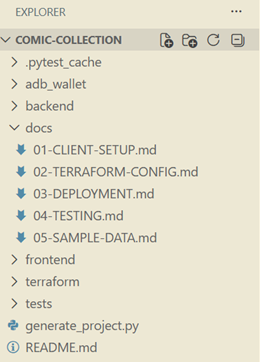
It also delivered a ~/docs subfolder which included even more documentation. Now to get this application deployed, I just need to go through the 01, 02, and 03 documents.
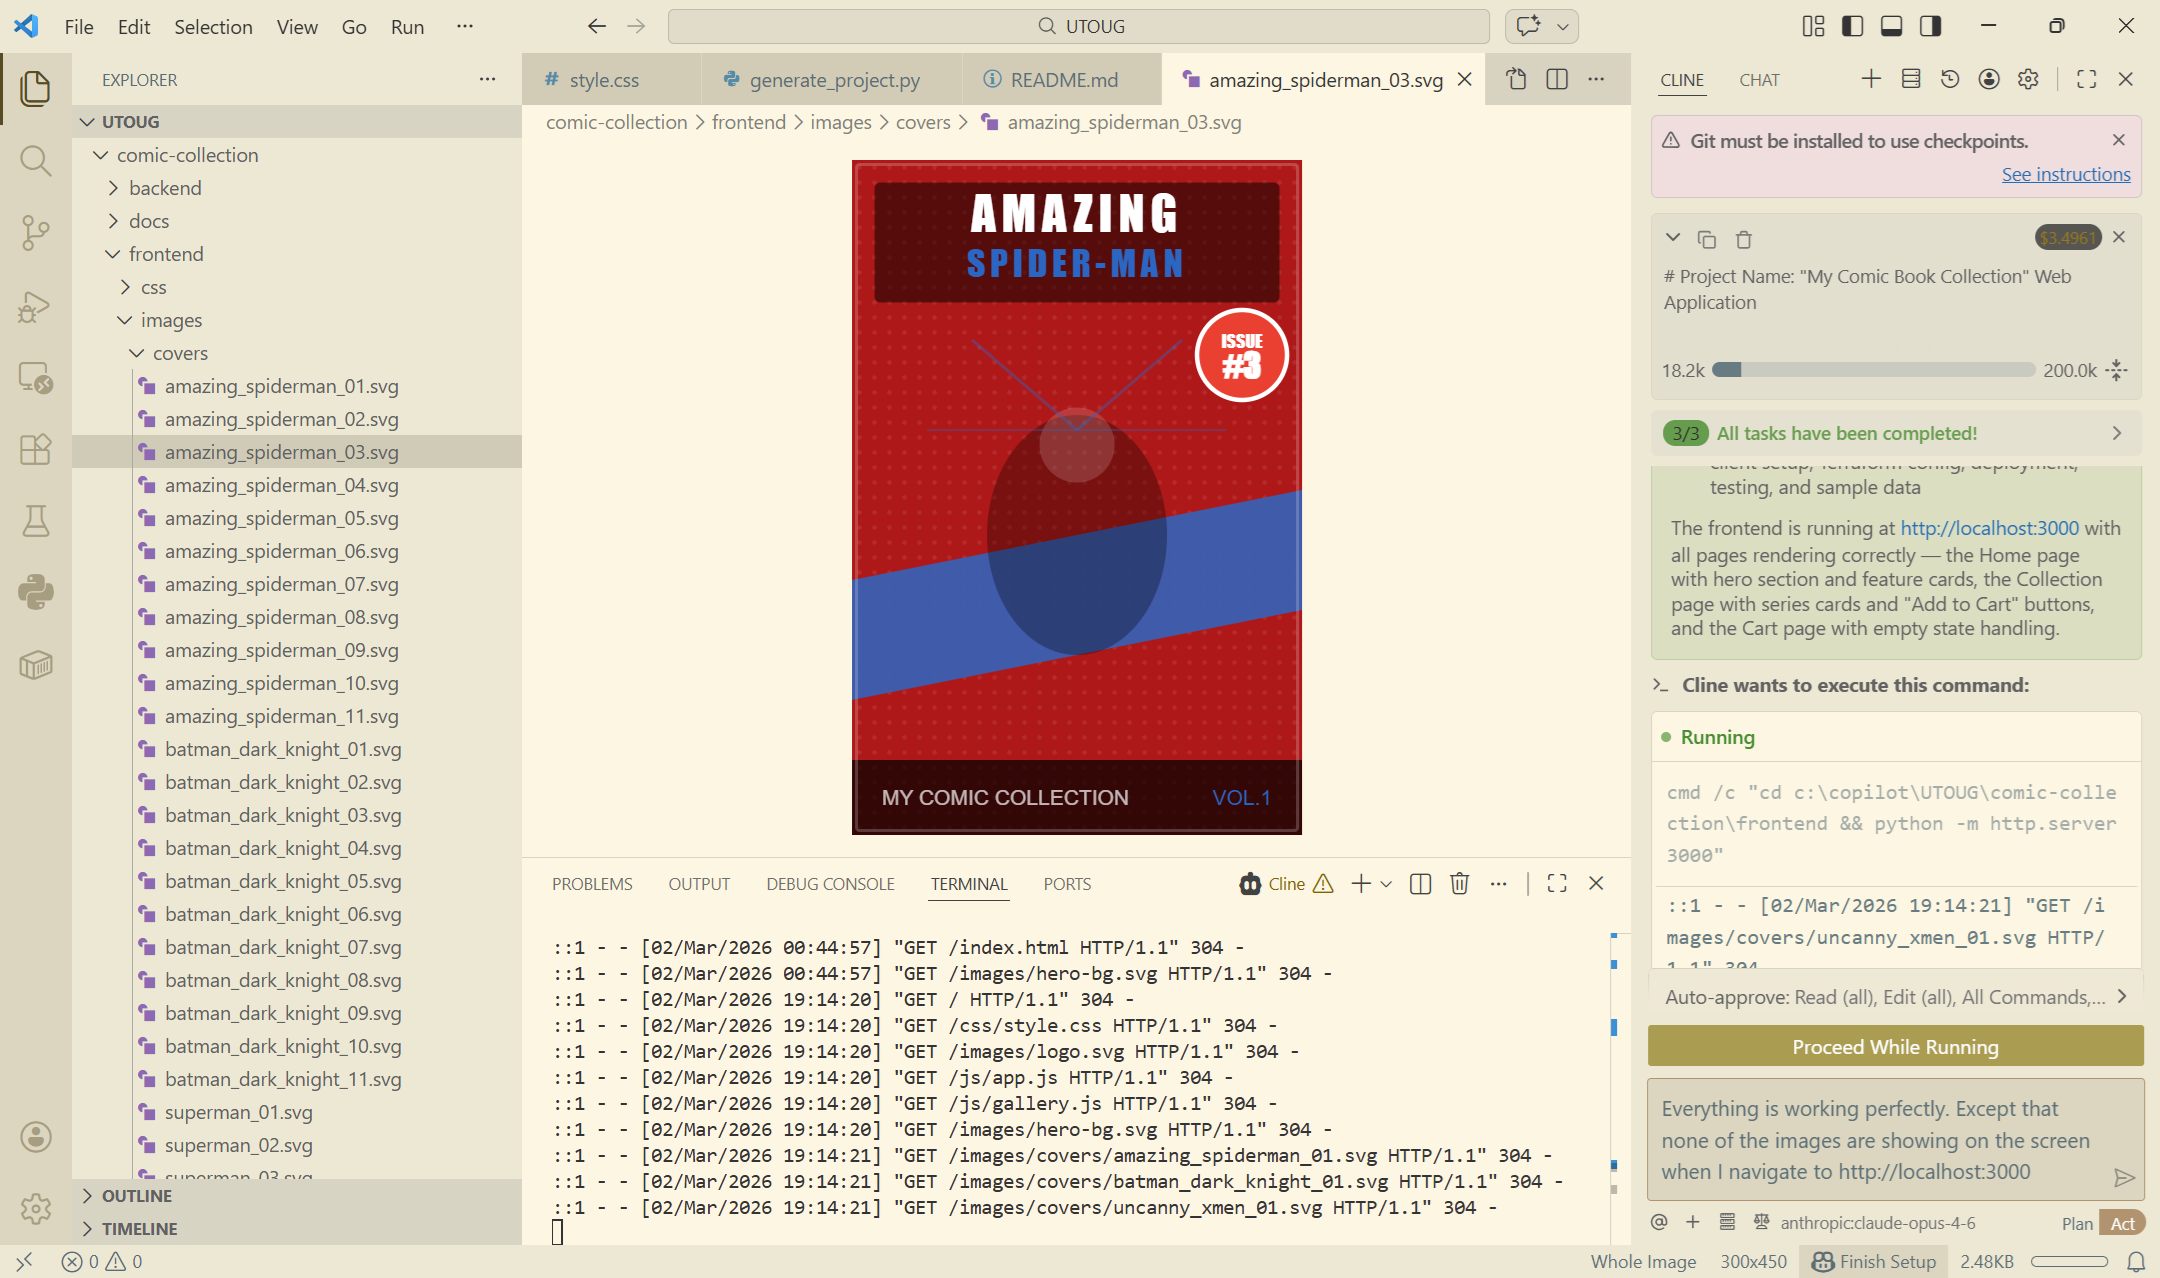
9. Testing the Application Locally
Cline started up application locally, with the frontend running on http://localhost:3000 and the backend Flask application running on http://localhost:8080. Here, you can see that it started both the HTTP server and the Flask server. But where's the database on my localhost?

But the images weren't rendering correctly, so Cline spent some time troubleshooting to try to figure out why that was so. Here is an example of one of the troubleshooting steps (opening the file locally first).
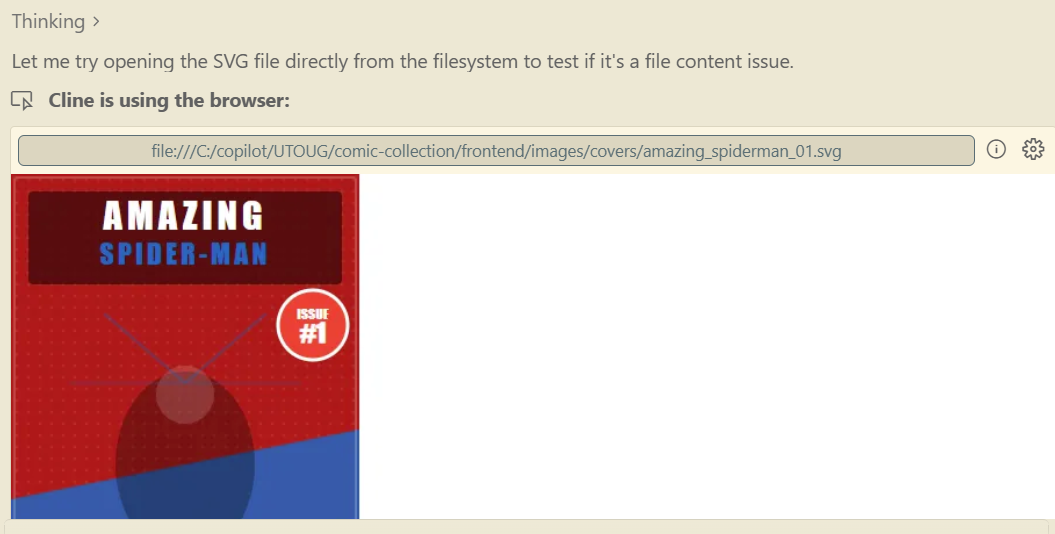
Cline stated that the root cause was that Python's built-in http.server on Windows serves SVG files with an incorrect MIME type (due to Windows registry MIME mappings), causing browsers to reject them. Anyway, it fixed it.
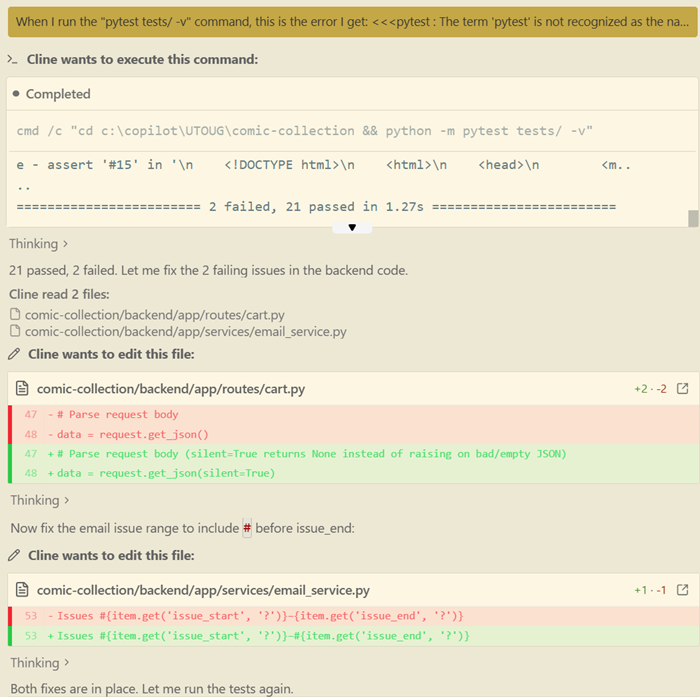
I manually ran the test cases using pytest, as indicated in the documentation, but I received an error indicating that the command was not recognized (see the first line in the following screenshot).
Cline executed the command to install pytest, ran through the test cases (21 passed, 2 failed), then proceeded to fix the code related to the two failed test cases.
9. Manually Running Terraform
I had originally requested Cline to use Terraform for infrastructure provisioning. It created all the Terraform .tf scripts for me, but I won't be able to run them unless I perform the following:
- Install Terraform, openssl, and the OCI client on my host machine (i.e., my laptop).
- Populate certain cloud credentials in the
terraform.tfvarsfiles. - Generate the public/private key pairs.
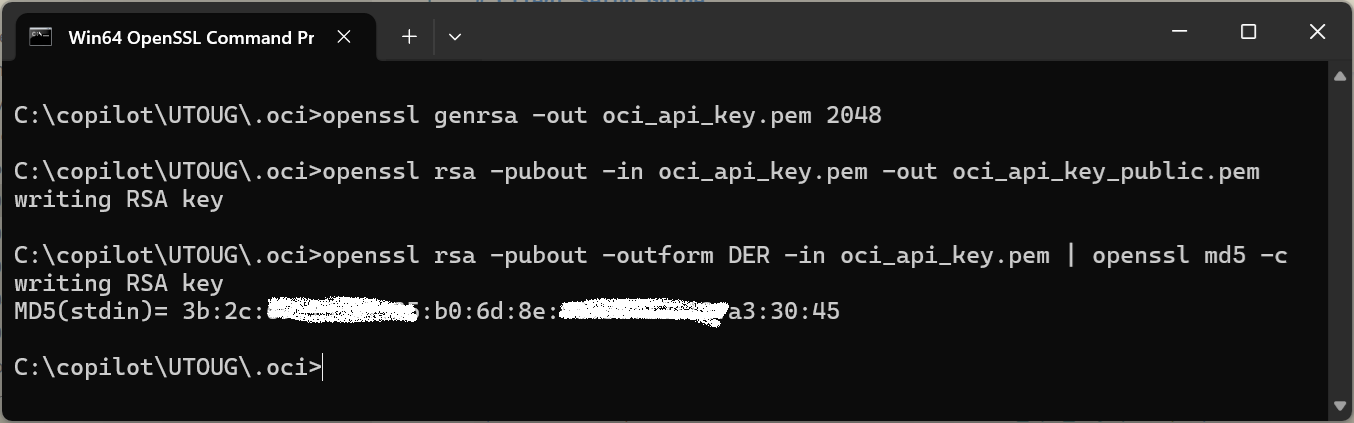
Full instructions were included in the readme files that were generated, but the execution wasn't flawless. I followed the instructions to create my key pairs:
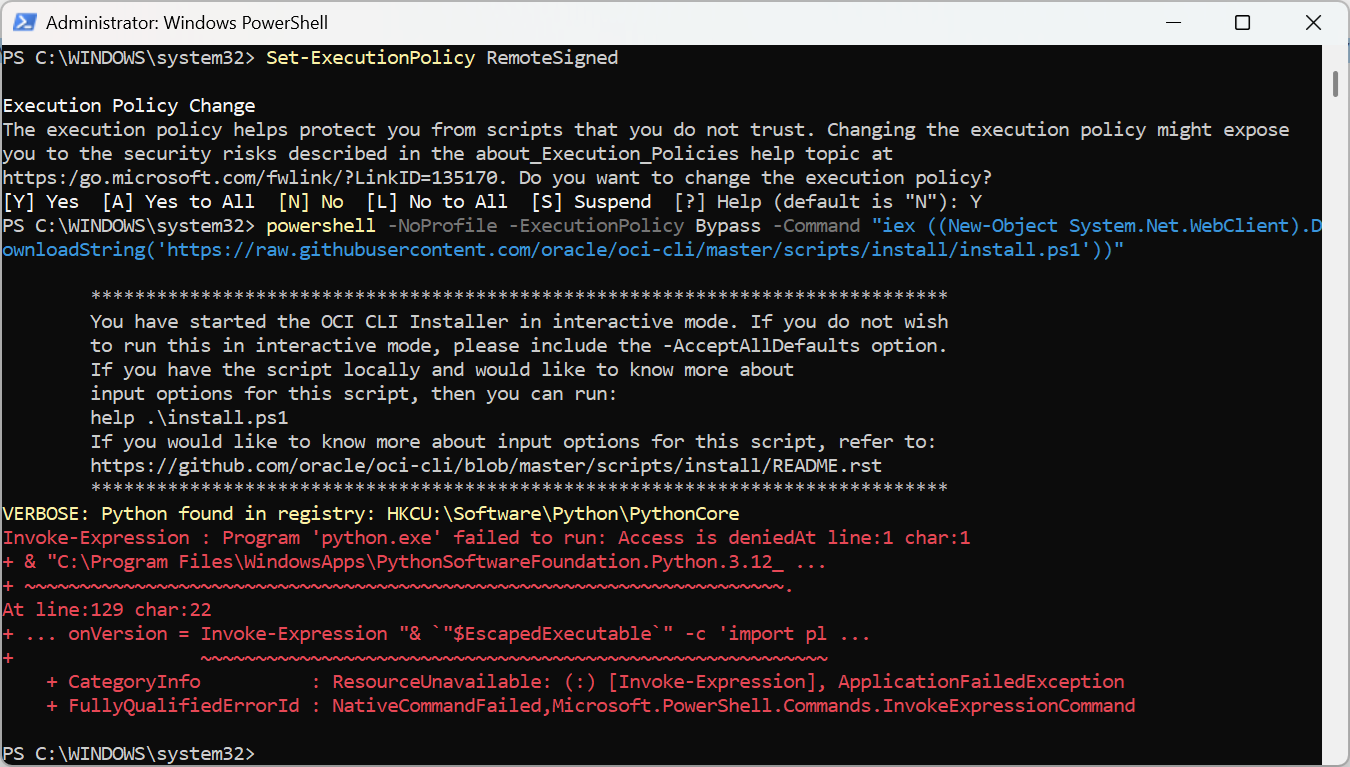
I ran into issues installing the OCI client and used a combination of Google and Cline to figure it out. One of the issues was some Window execution policy thingie.
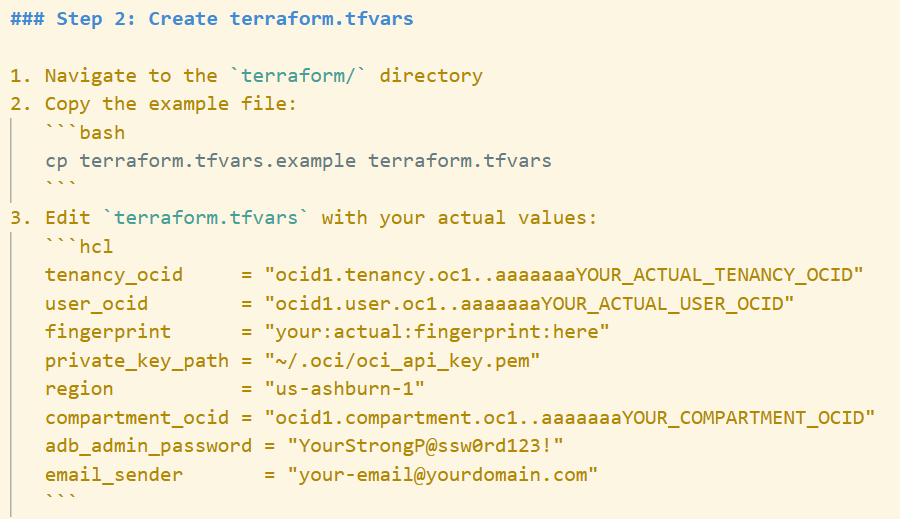
The 02-TERRAFORM-CONFIG.md file provided me all instructions and mentioned what values it needed from the OCI console:
But I ran into more issues running Terraform where I had to prompt Cline multiple times for assistance. Here are some of my prompts:
- The command Cline provided to install Terraform didn't work.
When the command "choco install terraform" in Windows, I got this error: "choco : The term 'choco' is not recognized as the name of a cmdlet, function,"
- Creating the API Gateway failed.
I received this error when running "terraform apply": <<<oci_apigateway_deployment.comic_api: Creating...
╷
│ Error: 400-InvalidParameter, Invalid specification.routes[0].backend.functionId: should be an ocid of type fnfunc
│ Suggestion: Please update the parameter(s) in the Terraform config as per error message Invalid specification.routes[0].backend.functionId: should be an ocid of type fnfunc
│ Documentation: https://registry.terraform.io/providers/oracle/oci/latest/docs/resources/apigateway_deployment
│ API Reference:
│ Request Target: POST https://apigateway.us-ashburn-1.oci.oraclecloud.com/20190501/deployments
│ Provider version: 8.4.0, released on 2026-03-04.
│ Service: Apigateway Deployment
│ Operation Name: CreateDeployment
│ OPC request ID: 4ff0aad05a433a0933724dd6659936c4/7C0155C4A9B1B2C22297AB694941449E/EC5637563A0E838E979FEB6C3D7C0DD0>>>
- It seems that there is a minor bug in the Terraform script to create the Autonomous Database. It fixed it automatically and asked me to try again.
When I ran the command "terraform apply" I received the following error: <<< Error: Unsupported attribute
│
│ on adb.tf line 26, in resource "oci_database_autonomous_database" "comic_adb":
│ 26: data_storage_size_in_gbs,
│
│ This object has no argument, nested block, or exported attribute named
│ "data_storage_size_in_gbs". Did you mean "data_storage_size_in_gb"? >>>
- Another problem create the OCI Function.
When I ran the command "terraform apply" I received the following error: <<< oci_functions_function.comic_function: Creating...
╷
│ Error: 400-InvalidParameter, Invalid Image us-ashburn-1.ocir.io/raastechinc/comic-collection/comic-api:0.0.1 does not exist or you do not have access to use it
│ Suggestion: Please update the parameter(s) in the Terraform config as per error message Invalid Image us-ashburn-1.ocir.io/raastechinc/comic-collection/comic-api:0.0.1 does not exist or you do not have access to use it
│ Documentation: https://registry.terraform.io/providers/oracle/oci/latest/docs/resources/functions_function
│ API Reference: https://docs.oracle.com/iaas/api/#/en/functions/20181201/Function/CreateFunction
│ Request Target: POST https://functions.us-ashburn-1.oci.oraclecloud.com/20181201/functions
│ Provider version: 8.4.0, released on 2026-03-04.
│ Service: Functions Function
│ Operation Name: CreateFunction
│ OPC request ID: 6b999f5955c10285ce291326a706f9fc/2D395F47FE488AA6FA98AB69494144DA/0A4140C3F31DBA7E83041640FB9E214C
│
│
│ with oci_functions_function.comic_function,
│ on functions.tf line 32, in resource "oci_functions_function" "comic_function":
│ 32: resource "oci_functions_function" "comic_function" { >>>
Cline responded with resolutions to each and every one of these and I was successful in creating the entire infrastructure.
10. Deploy the Container
I ran into a number of errors when following the instructions in 03-DEPLOYMENT.md to deploy all the code. Here's a stripped down version of that deployment guide:
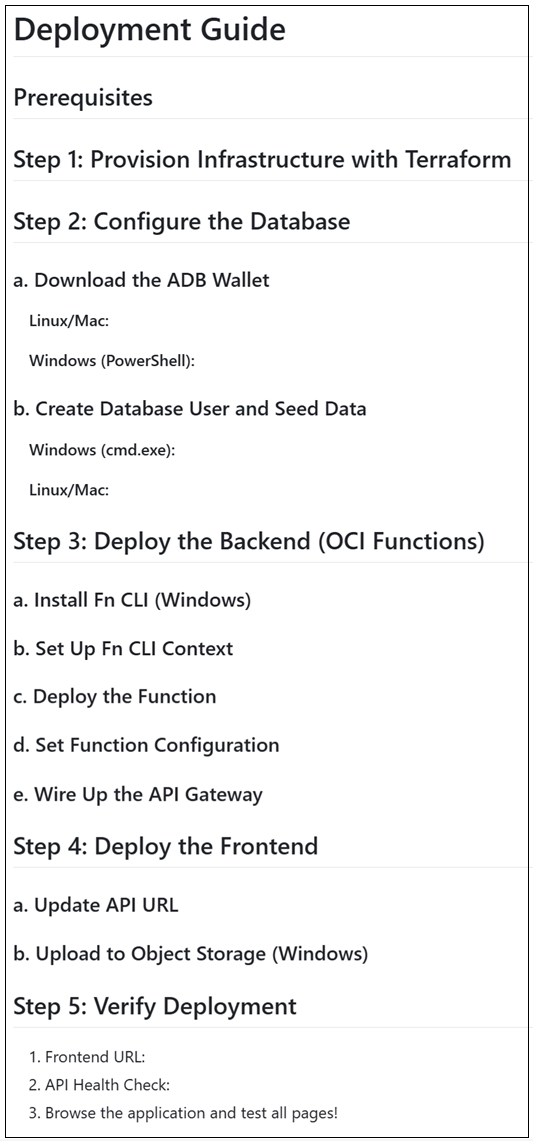
First, I asked it Cline to do the following:
Can you update "03-DEPLOYMENT.md" and update Step 3 to make it using Microsoft Windows commands, not Linux commands?
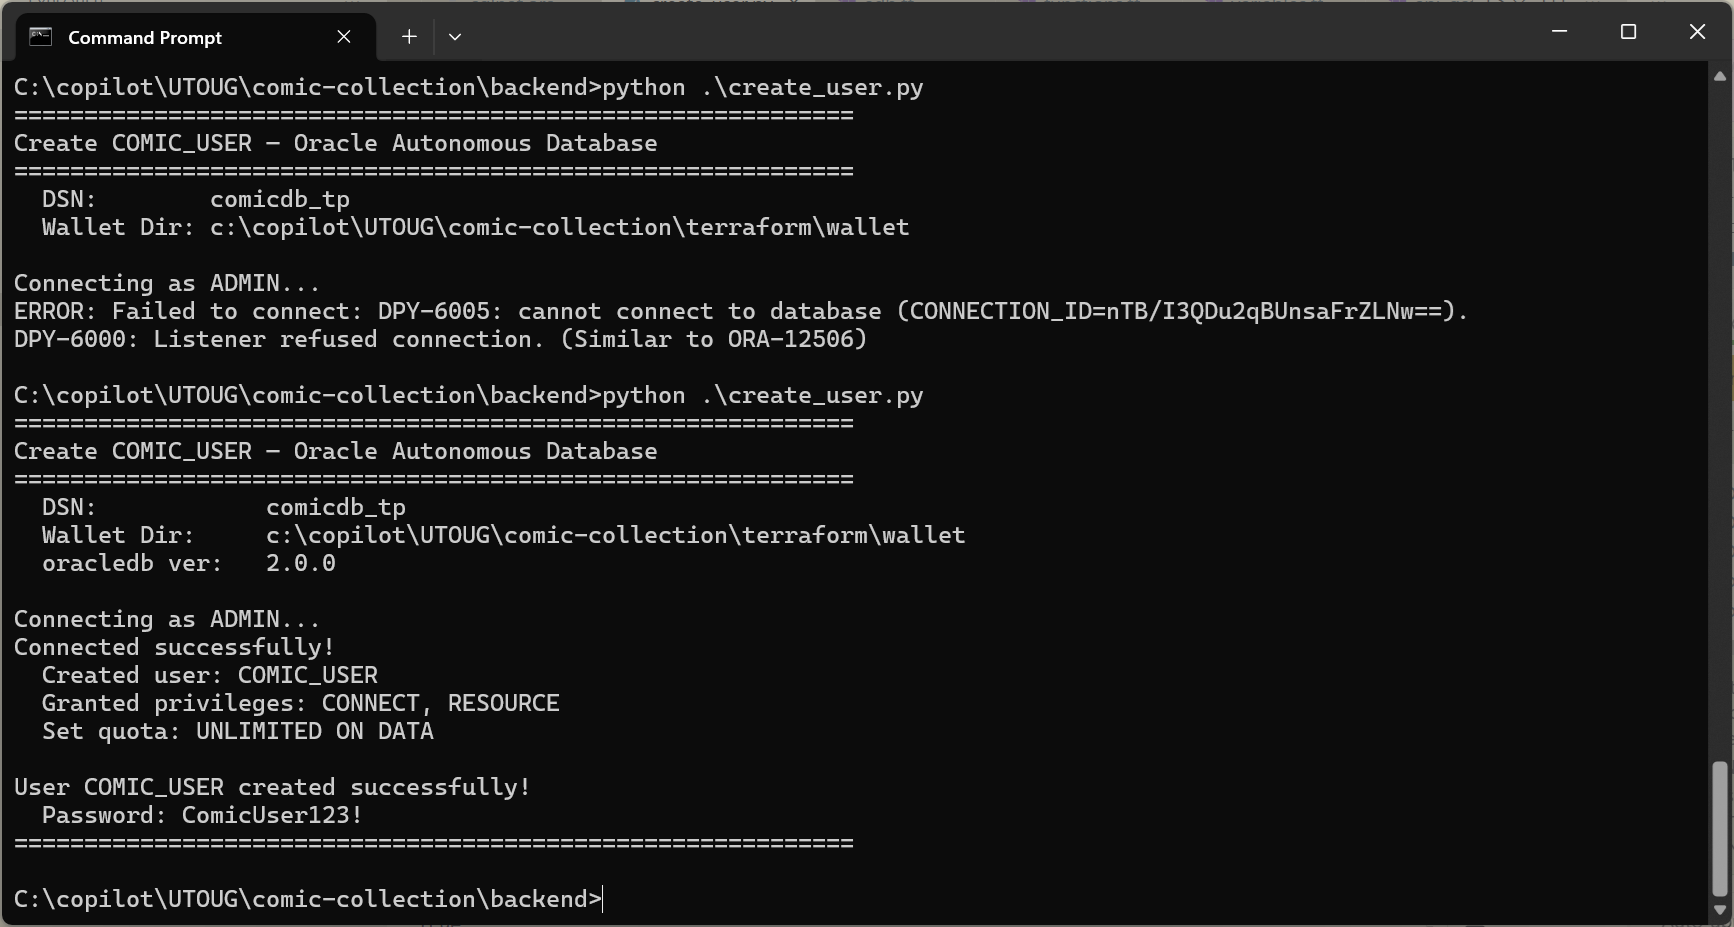
Steps 2.a and 2.b went fine which were all the Terraform stuff. Now that all the OCI services were provisioned, I ran a script to populate the database with sample data. I also ran into authentication issues, and after 15 minutes of back-and-forth with the AI agent, we were able to resolve it (something to do with password complexity).
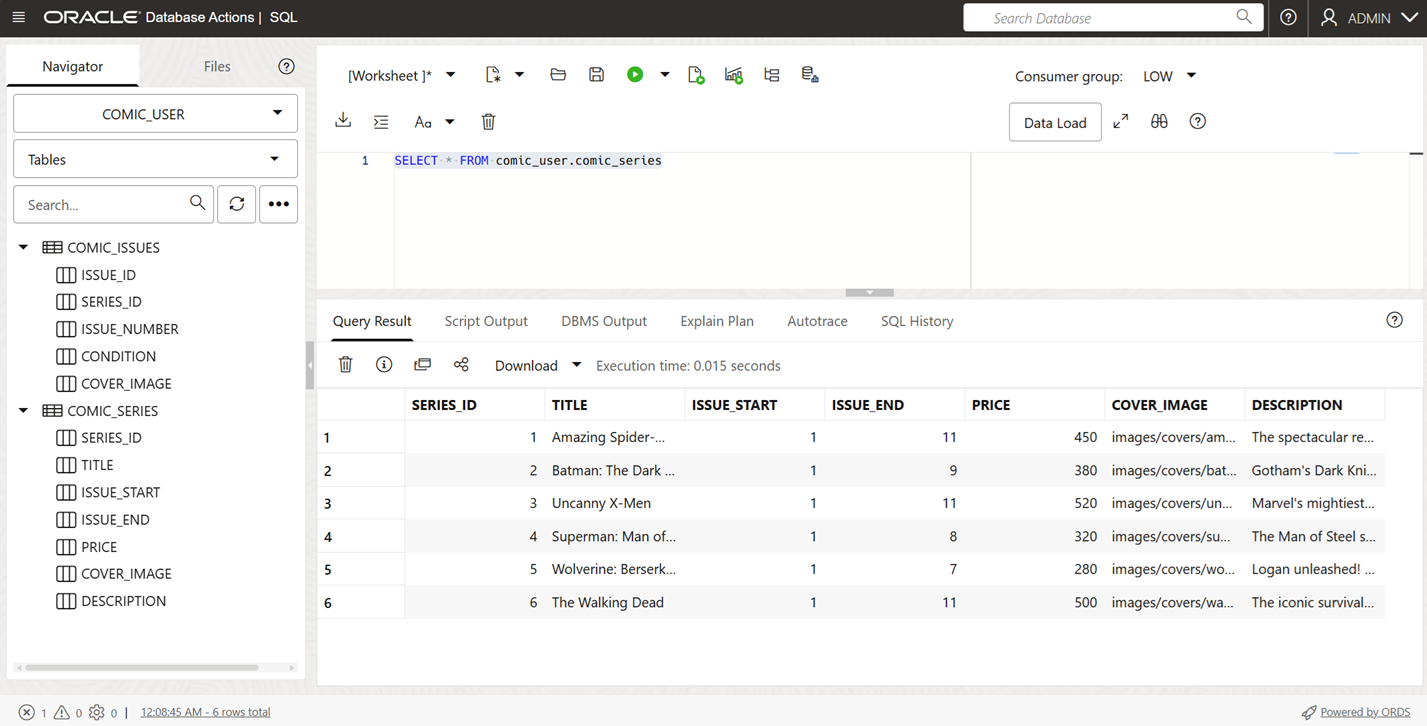
I was able to confirm on the OCI console that the data was there:
As I approached Step 3.b, which is deploying the OCI function, I ran into multiple issues:
When I ran "fn use context oci-context" I received the following error <<< Fn: error replacing file with tempfile >>> Also, which directory am I supposed to be in when I run this command?
When I ran the "docker" command I received the following error <<< WARNING! Using --password via the CLI is insecure. Use --password-stdin.
error during connect: in the default daemon configuration on Windows, the docker client must be run with elevated privileges to connect: Post "http://%2F%2F.%2Fpipe%2Fdocker_engine/v1.24/auth": open //./pipe/docker_engine: The system cannot find the file specified. >>>
I started the Docker Desktop successfully. Running "docker info" just hangs indefinitely (I waited for at least 5 minutes). And the "docker login" command also hangs indefinitely (I waited for at least 5 minutes).
The Cline AI agent took over from here. The agent tried deploying unsuccessfully (remember, I gave it auto-approve permissions to execute any command it wants to), it observed the error, analyzed what the root cause could be, fixed it (sometimes successfully, sometimes unsuccessfully), and on failed fixes it would continue troubleshooting until it got it right. There were a lot of issues, but Cline figured it all out.
After the OCI Function was deployed, it took the OCID on its own, updated the Terraform scripts with the value of the OCID, and applied the change via Terraform to update the API Gateway... all automatically on its own!
All along the way, it continued fixing the documentation, code, and Terraform scripts as needed.
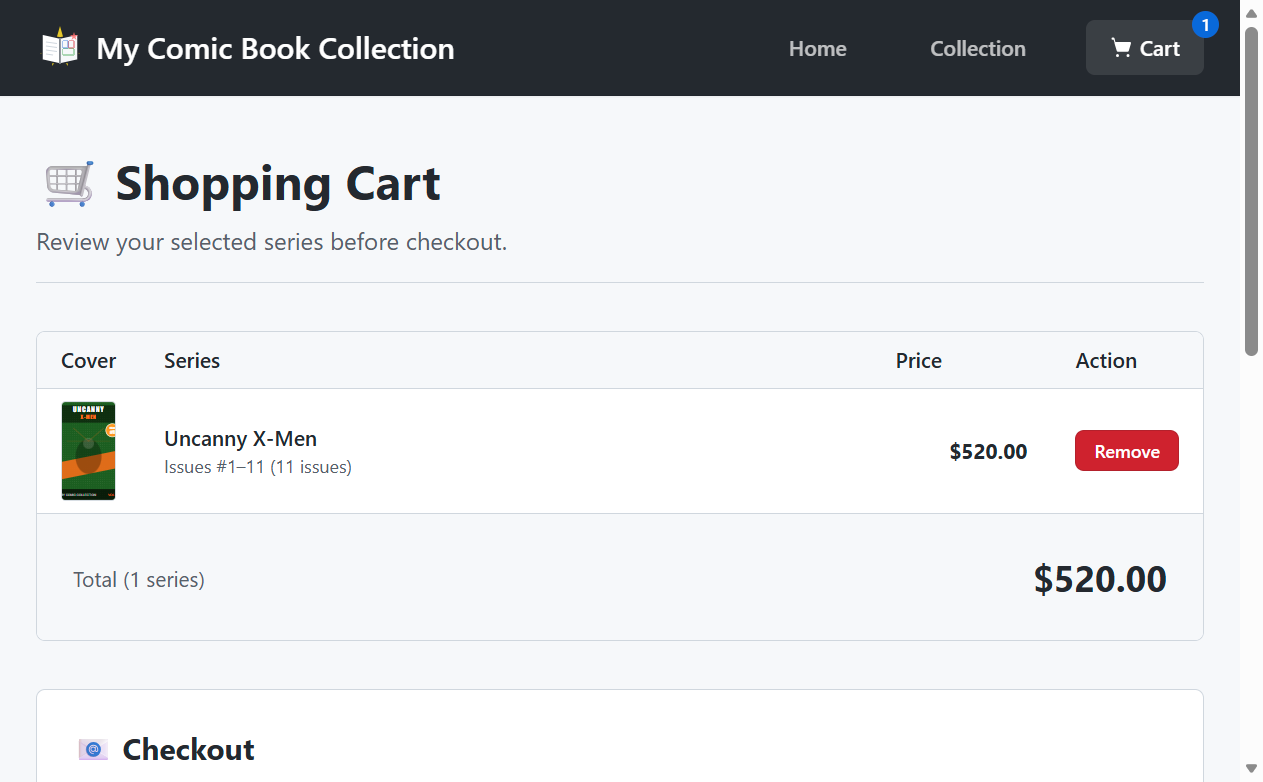
11. Testing the Deployed Application
Now that the application was deployed successfully on the cloud, Cline gave me the public URL. Here are a couple of screenshots of the application.
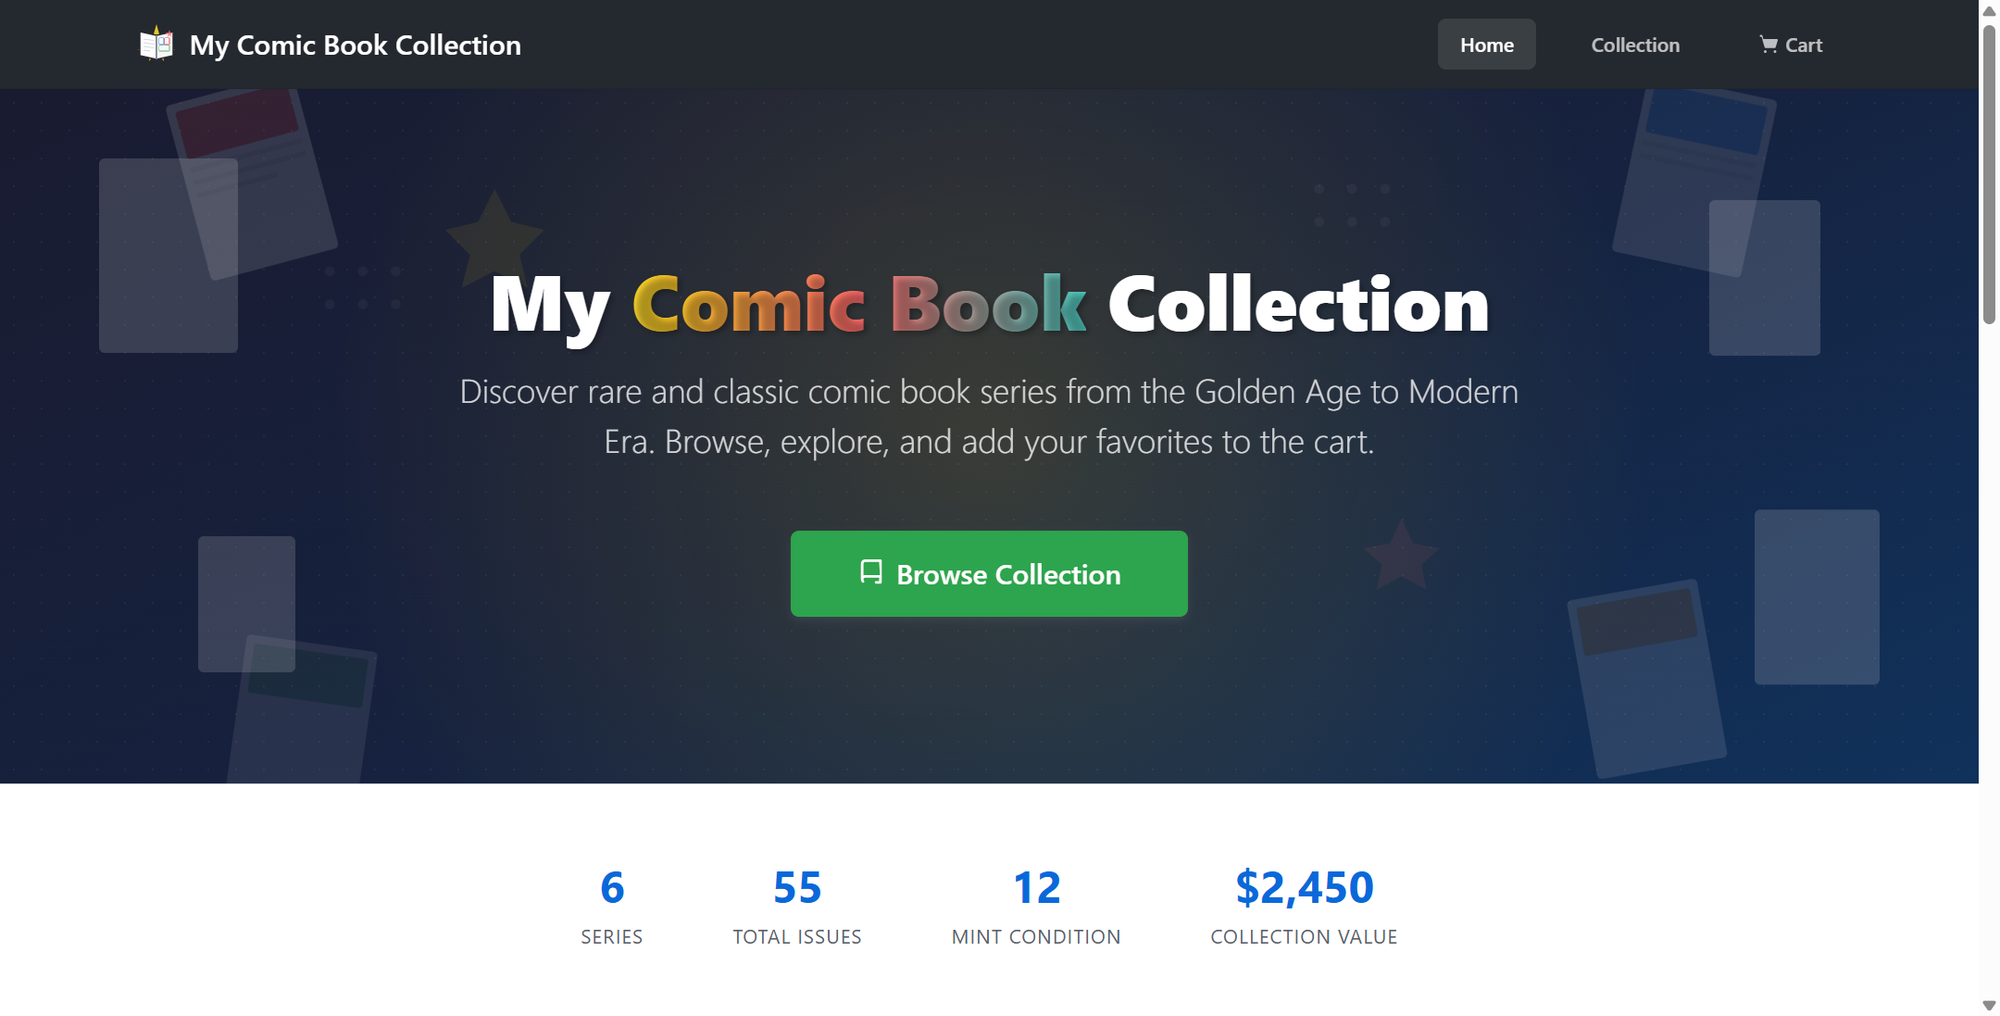

All the functionality was working, from navigation, to adding to the cart, to checking out.
12. Testing the Deployed Application
I asked Cline the following aftewards:
Export this entire chat into an HTML file(s) maintaining all formatting and images.
Unfortunately, it did not do as I expected. I wanted a word-for-word export of the entire chat history, maintaining all formatting. Instead, it created a fully comprehensive (and impressive) HTML file with an organized version of what took place.

But from this writeup, this was one of the key information that I was looking for:
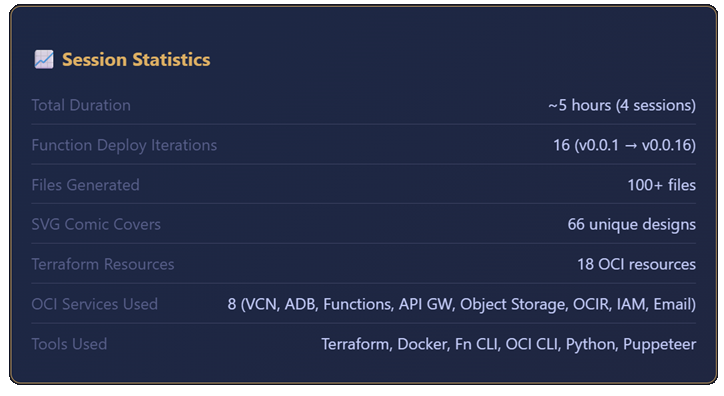
Across 4 sessions, the total engagement time was ~5 hours with a total cost of $32.35.