Clerk: Security Injection
The previous post outlined the primary reasons why you may want to use authentication as a service, and walked you through the main preparation steps. Now we are ready to complete the security configuration for a Flask application and test the results.


The previous post outlined the primary reasons why you may want to use authentication as a service, and walked you through the main preparation steps. Now we are ready to complete the security configuration for a Flask application and test the results.
If you start with this article, you may want to skim the first part, "Clerk: Identity as a service," but you can continue as is. And today, I want to start with the authentication flow we are trying to build using Python Flask as the back-end and HTML/JavaScript as the front-end. The diagram below illustrates steps we should be aware of and ensure that both the front-end and back-end are in sync regarding the application session.

The front-end component provides an application user with authentication controls and establishes initial communication between the user and the Clerk authentication service. If selected, the Clerk handles authentication via third-party OpenID Connect/OAuth2 services, creates a signed JWT token containing the current session state, and sends it to an application callback URL. Finally, an application handles the session token, which is passed as a cookie or via a handshake request. Based on the session state, the application server produces an updated web page and serves it to the end user. We have all we need, let's code.
We start where we left off, from the Flask back-end. Let's add Clerk imports and initiate the client. The new top part now looks like the snipped below.
# ... Existing Flask Imports

from clerk_backend_api import Clerk
from clerk_backend_api.security.types import AuthenticateRequestOptions
import jwt
import logging
logger = logging.getLogger(__name__)
logging.basicConfig(level=logging.INFO)


load_dotenv()

app = Flask(__name__)
app.config['SECRET_KEY'] = os.getenv('FLASK_SESSION_SECRET')

origins = [os.getenv('APP_URL', 'http://localhost:5001')]
clerk_client = Clerk(bearer_auth=os.getenv('CLERK_SECRET_KEY'),
            debug_logger=logging.getLogger("clerk:api"))

# Route handlers
The new commands import the Clerk API and perform the Clerk SDK initialization. Now, let's add a function that checks the Flask request, extracts the Clerk cookies from the handshake parameter, and returns them as a list of raw cookies.
def check_clerk_handshake(request):
    try:
        # Check query parameters
        handshake_token = request.args.get("__clerk_handshake")
        if handshake_token:
            logger.debug(f"Clerk handshake token from query params:
            {handshake_token}")
            decoded = jwt.decode(handshake_token.encode('utf-8'),
            options={"verify_signature": False})
            logger.debug(f"Clerk handshake decoded: {decoded}")
            if isinstance(decoded, dict) and
                   isinstance(decoded.get("handshake"), list):
                handshake_list = decoded.get("handshake")
            elif isinstance(decoded, list):
                handshake_list = decoded
                logger.debug("Clerk handshake cookies set in request")
            return handshake_list
    except jwt.DecodeError as e:
        logger.error(f"Failed to decode clerk handshake token: {str(e)}")
        return None
    except Exception as e:
        logger.error(f"Error handling clerk handshake: {str(e)}")
        return None
The function verifies session JWT and returns a Clerk session state
Now we add a middleware preprocessor that handles two cases: completing a handshake with Clerk and validating the current session. When the front-end client is already authenticated, the back-end should process the Clerk's callback request.
@app.before_request
def request_clerk_state():
    clerk_cookies = check_clerk_handshake(request)
    logging.debug(f"Clerk cookies from handshake: {clerk_cookies}")
    if clerk_cookies:
        request.environ['HTTP_COOKIE'] = '; '.join(clerk_cookies)
        logging.debug(f"Modified request for Clerk: {request}")
    try:
        # Authenticate the request with Clerk
        request_state = clerk_client.authenticate_request(
            request,
            AuthenticateRequestOptions(
                authorized_parties=origins
            )
        )
        logger.debug(f"Authentication state: {request_state.is_authenticated}, Payload: {request_state.payload}")
        session['clerk_state'] = request_state
    except Exception as e:
        logger.error(f"Error during Clerk authentication: {e}")
Handling the Clerk Handshake Requests
Run your server, and access the index page. The server console should show you a debug message in the output log.
$ uv run python main.py
....
 * Running on all addresses (0.0.0.0)
 * Running on http://127.0.0.1:5001
 * Running on http://192.168.68.56:5001
INFO:werkzeug:Press CTRL+C to quit
INFO:werkzeug: * Restarting with stat
WARNING:werkzeug: * Debugger is active!
INFO:werkzeug: * Debugger PIN: 478-128-611
INFO:httpx:HTTP Request: GET https://api.clerk.com/v1/jwks "HTTP/1.1 200 OK"
INFO:werkzeug:127.0.0.1 - - [24/Nov/2025 11:18:06] "GET / HTTP/1.1" 200 -
INFO:werkzeug:127.0.0.1 - - [24/Nov/2025 11:18:06] "GET /static/css/styles.css HTTP/1.1" 200 -
INFO:werkzeug:127.0.0.1 - - [24/Nov/2025 11:18:06] "GET /favicon.ico HTTP/1.1" 404 -
Clerk SDK pulls JWT keystore.
Before we switch to the front end, let's pass parameters to the Jinja templates. You may want to pass those parameters only to the protected resources, but I'll use the same call for all three pages for uniformity.
@app.route('/')
def index():
    logger.debug(f"Clerk state in index route: {clerk_state}")
    _cs = session.get('clerk_state')
    return render_template('index.html',
                   cerk_publishable_key=os.getenv('CLERK_PUBLISHABLE_KEY'),
                   is_authenticated=_cs.status ==
                                 AuthStatus.SIGNED_IN if _cs else False,
                   clerk_state=_cs)
@app.route('/plans')
def plans():
    _cs = session.get('clerk_state')
    return render_template('plans.html',
                   cerk_publishable_key=os.getenv('CLERK_PUBLISHABLE_KEY'),
                   is_authenticated=_cs.status ==
                                 AuthStatus.SIGNED_IN if _cs else False,
                   clerk_state=_cs)

@app.route('/profile')
def profile():
    _cs = session.get('clerk_state')
    return render_template('profile.html',
                   cerk_publishable_key=os.getenv('CLERK_PUBLISHABLE_KEY'),
                   is_authenticated=_cs.status ==
                                 AuthStatus.SIGNED_IN if _cs else False,
                   clerk_state=_cs)
It's time to add Clerk JavaScript to the front-end templates, starting with the JavaScript library. Put the script declaration into the header.html, right after the body tag.
<!--  Initialize Clerk with your Clerk Publishable Key and Frontend API URL  -->
<script
  async
  crossorigin="anonymous"
  data-clerk-publishable-key="{{ clerk_publishable_key }}"
  src="https://natural-kid-22.clerk.accounts.dev/npm/@clerk/clerk-js@5/dist/clerk.browser.js"
  type="text/javascript">
</script>
Initiate the Clerk JS SDK
As you may notice, we pass the publishable key as a library parameter. This key will be available to the public, but it is very similar to the certificates; you are safe until your private key is protected and unavailable.
Now, let's make our login button actionable. Add the onClick attribute to the button in the header.html partial.
<div class="nav-right" style="display: none">
  <button class="login-btn" onclick="Clerk.openSignIn()">
     <svg class="anonymous-icon" ..... />
     </svg>
  </button>
</div>
Notice that I hide the whole right navigation. The reason is that I don't want it to flick until we finally decide what to show to the end user.
Add visual processing to the body of index.html to reflect the current session status.
<div class="hero-section">
    {% if is_authenticated %}
    <h1> Hello {{ clerk_state.payload.sub }}</h1>
    <p class="subtitle">Integrate external authentication into your Flask application</p>
    <div class="hero-actions">
        <button class="btn btn-primary">Get Started</button>
        <button class="btn btn-secondary">Learn More</button>
    </div>
    {% else %}
    <h1>Welcome to Flask with Clerk</h1>
    <p class="subtitle">Please sign in to access personalized features</p>
    <div class="hero-actions">
        <button class="btn btn-primary" onclick="Clerk.openSignIn()">Sign In</button>
    </div>
    {% endif %}
</div>
Add personalized greeting to the home page
To make all that work, initialize the Clerk SDK as soon as a page loads. Open the footer.html partial and add the script content right after the footer section.
<script>
    window.addEventListener('load', async function () {
        await Clerk.load()
        loginDiv = document.getElementById('login-div')
        if (Clerk.isSignedIn) {
            loginDiv.innerHTML = `<div id='user-button'></div>`;
            Clerk.mountUserButton(document.getElementById('user-button'))
        }
        // Show login button
        loginDiv.style.display = 'block';

            // Mount user profile on the profile page
        const profileDiv = document.getElementById('profile')
          // Display the mount results to avoid flash of unstyled content
        if (Clerk.user && profileDiv) {
                Clerk.mountUserProfile(profileDiv)
            }

        // Mount pricing table on the  plans page
        const pricingTableDiv = document.getElementById('subscription-plans')
        if (pricingTableDiv) {
            Clerk.mountPricingTable(pricingTableDiv)
        }
  })
</script>
Since the footer and header are shared, the script checks if placeholder elements are present and tries to mount Clerk UI components. You may find additional details in the Clerk JS documentation.
Let's run the application and try to log in. Upon success, clicking the login button in the top-right corner will open the Clerk login form, as shown in the screenshot below.
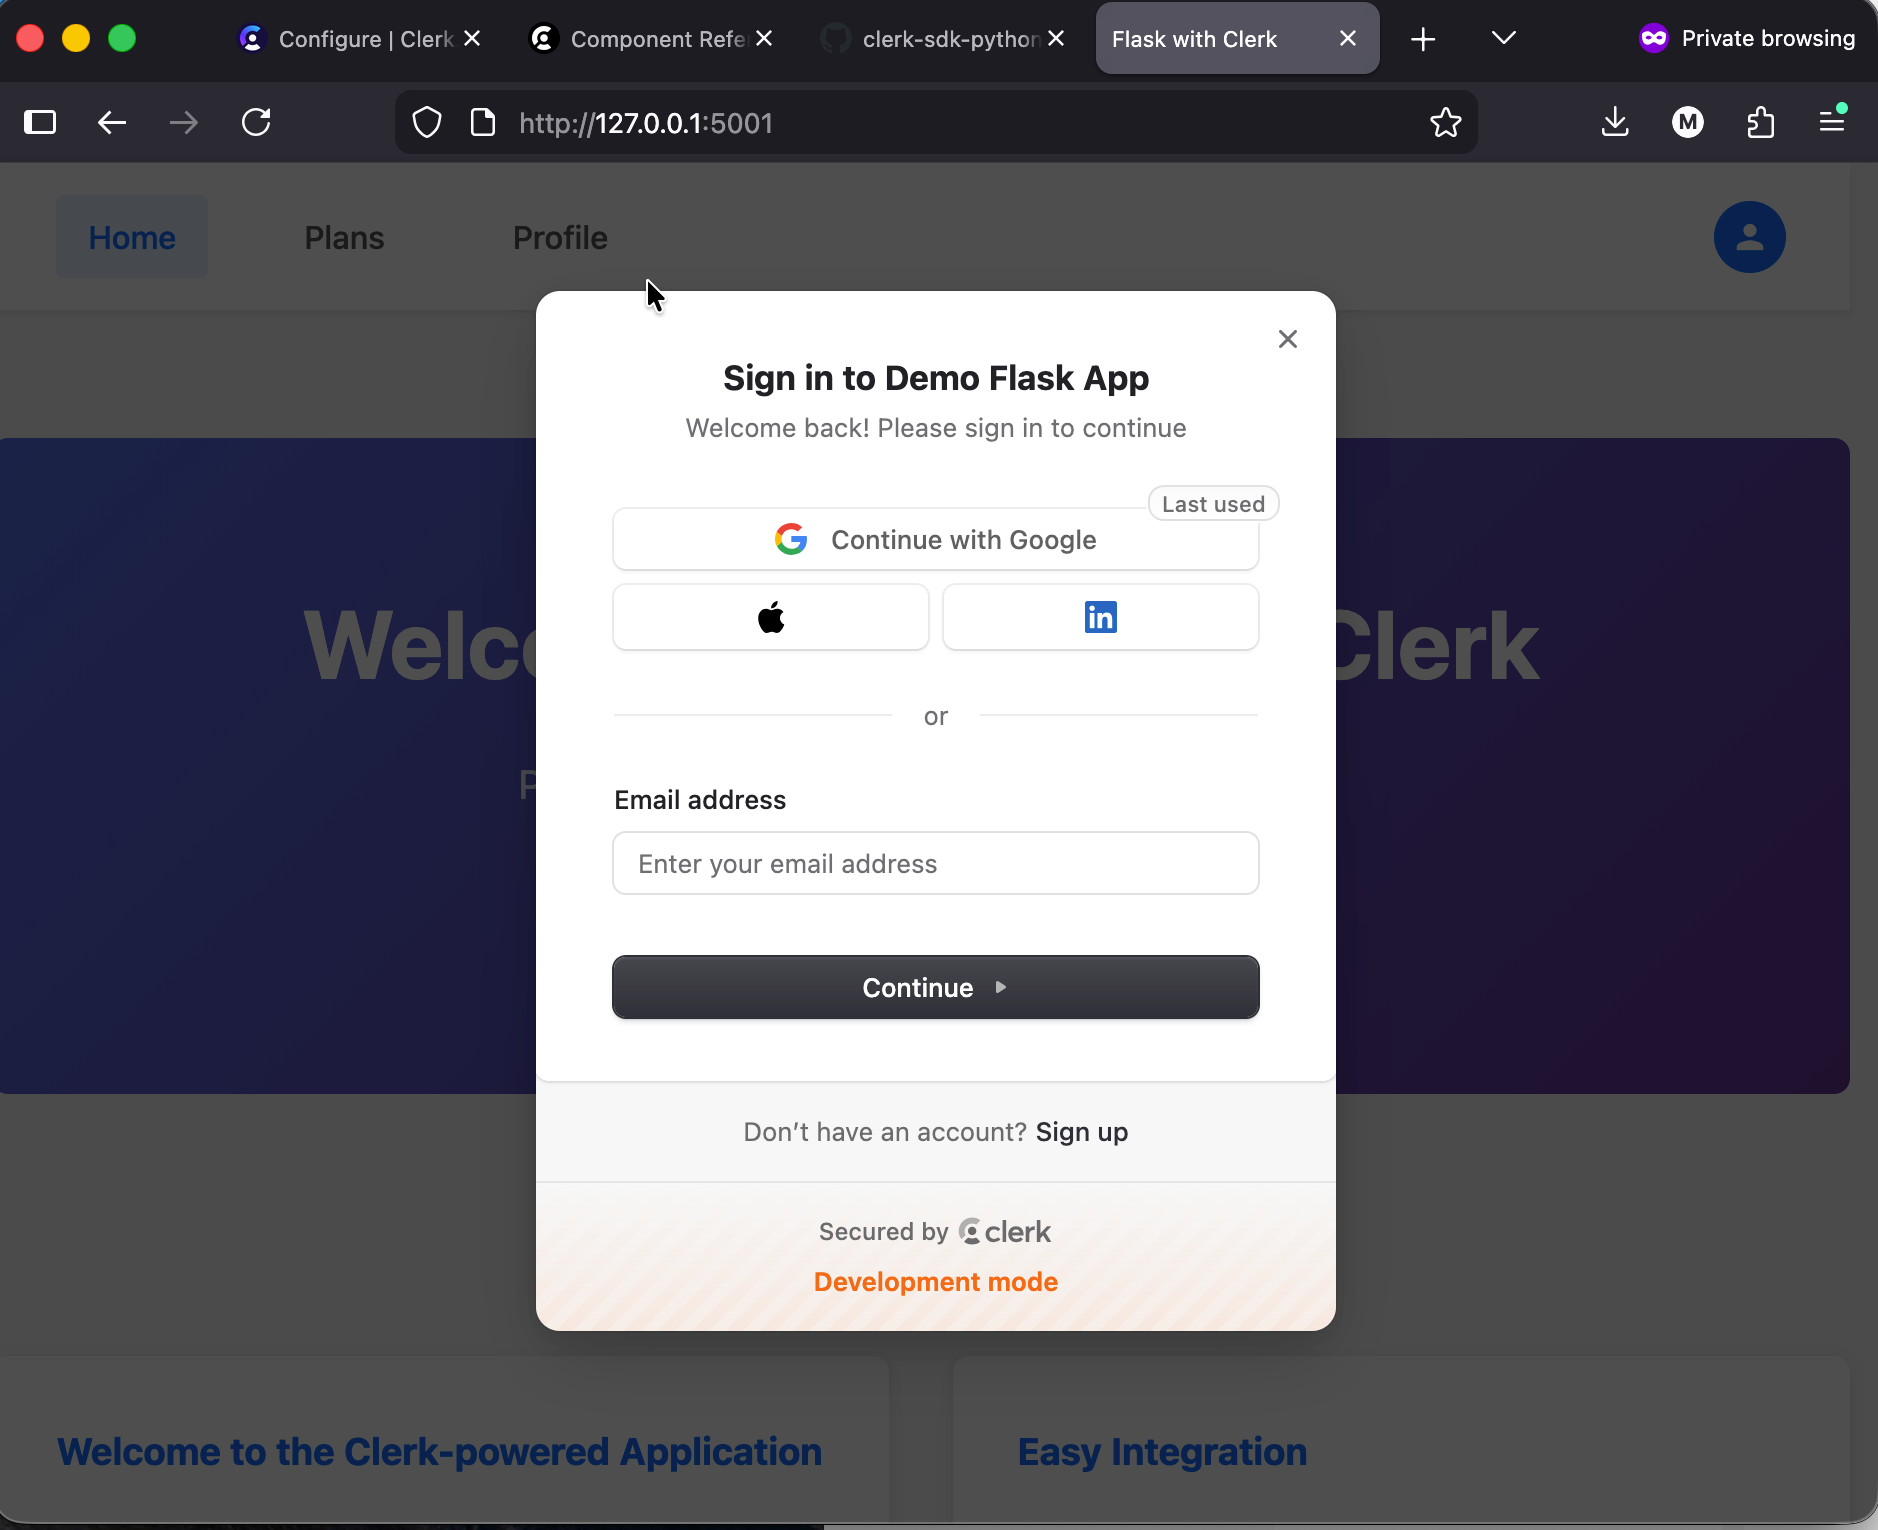
Complete the sign-in process, and our secure application will display content for registered users.
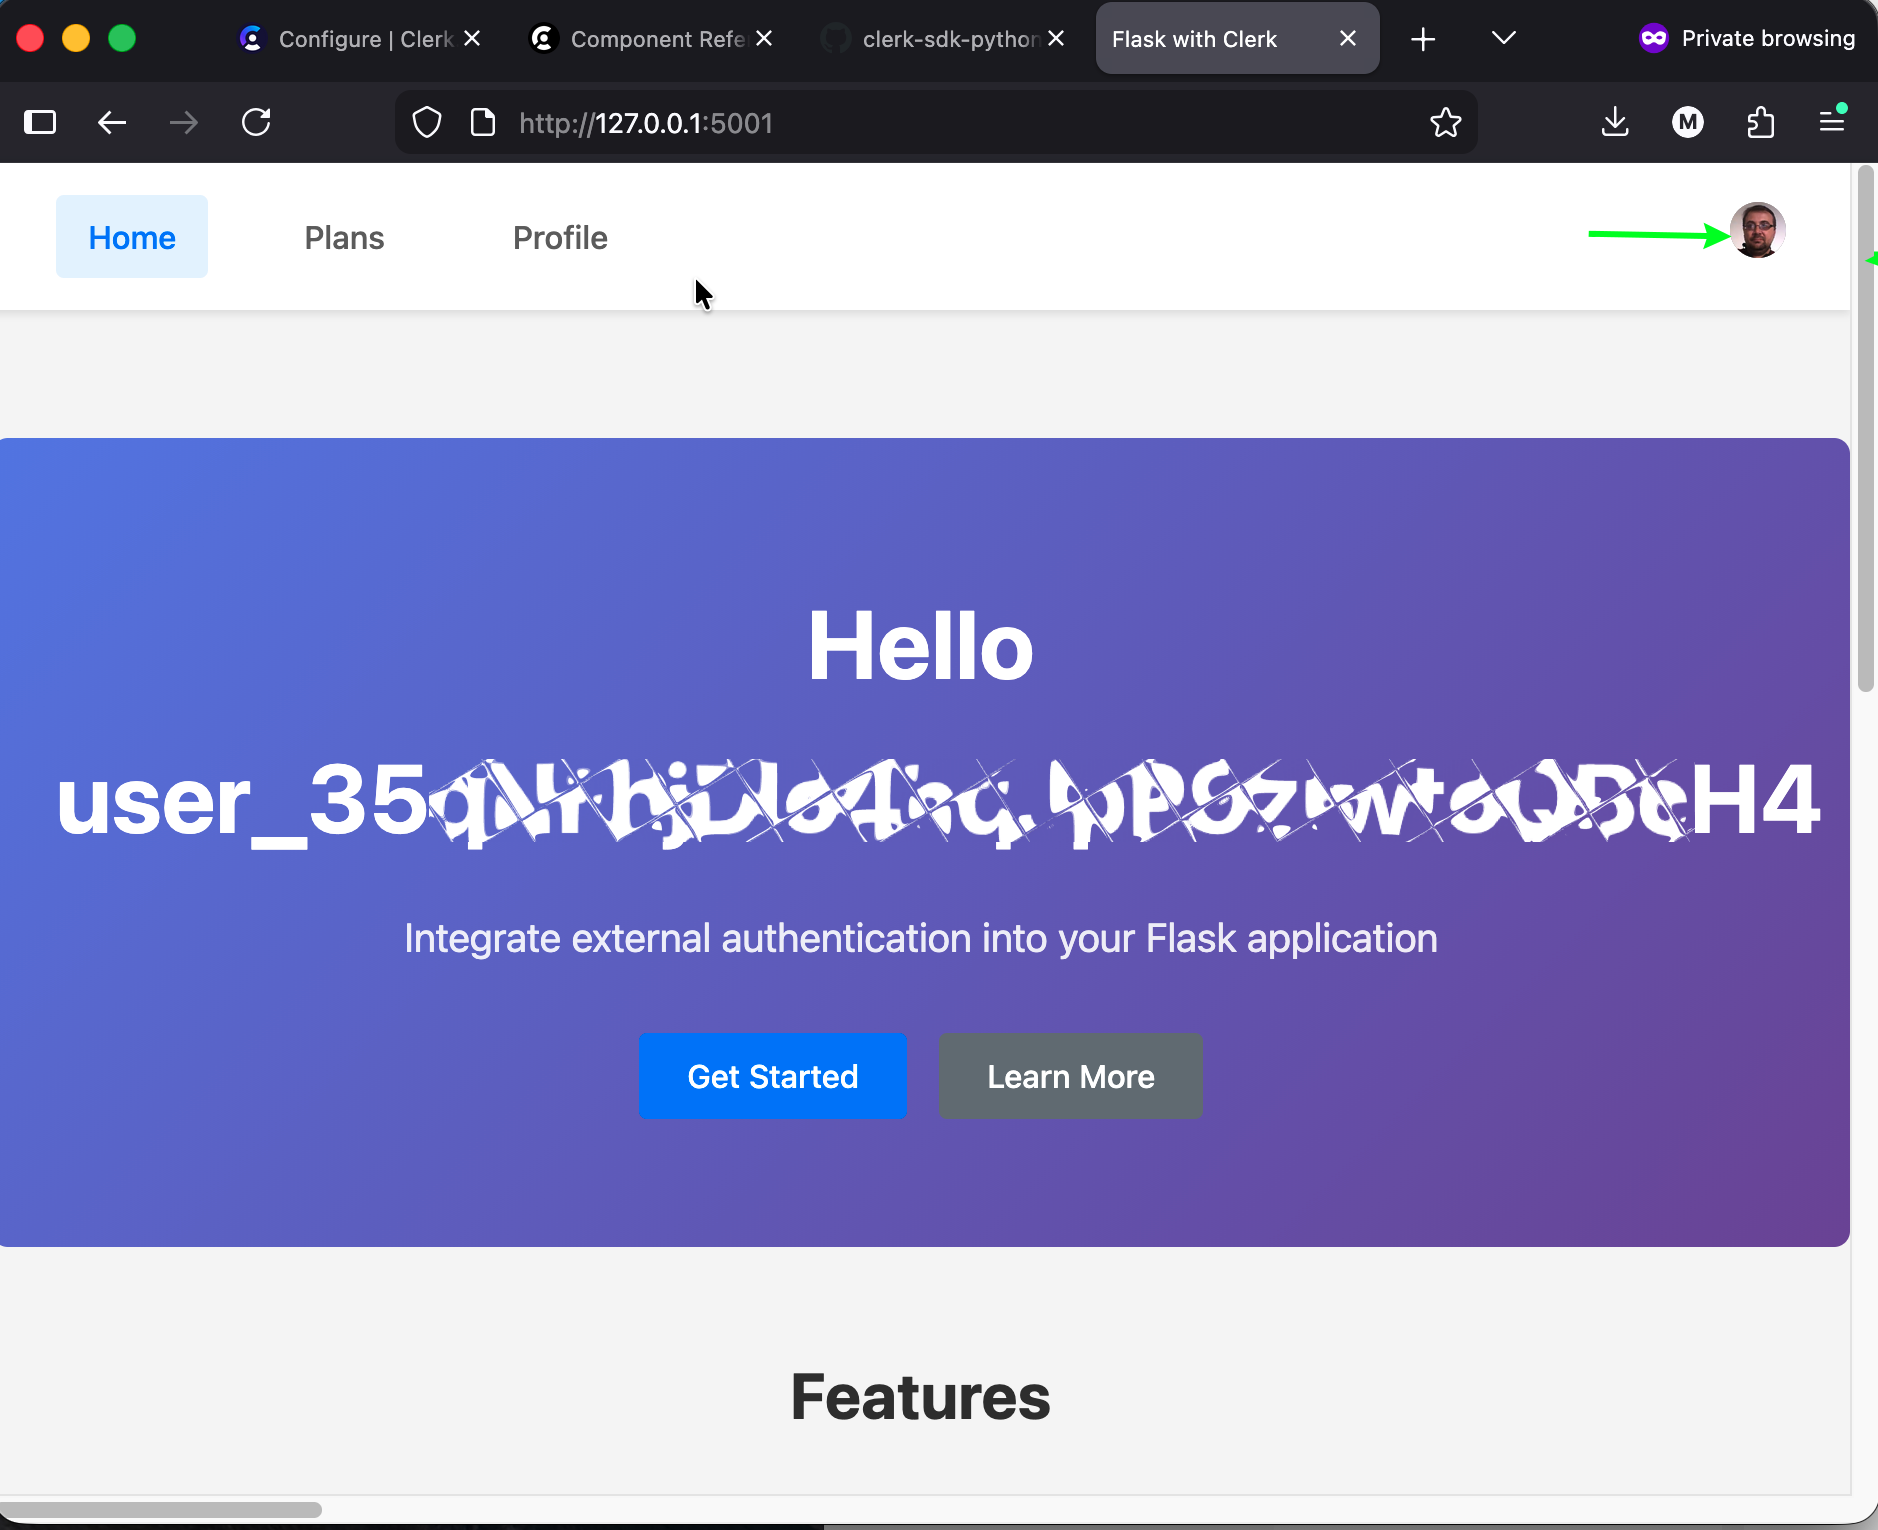
As you see, Flask renders the homepage using the session payload and status. If you noticed, Clerk SDK replaces the default login button with its own widget.
The source code is published in our sample code GitHub repository. Although we successfully configured user authentication, you may still want to finish the configuration with:
- Access additional user details, such as name, email, and other attributes, including subscription status.
- How to integrate more components into your application.
All that we will discuss in the third and last part of the series.
Where to start: https://chronicler.tech/clerk-identity-as-a-service/
This post: https://chronicler.tech/clerk-secuirty-injection/
Clerk Session and Plans: https://chronicler.tech/clerk-session-and-plans/